Railing families are system families so they are defined in a project. They can't be loaded from an external library, they can be copied and pasted from one project to another or transferred from one project to another using the Transfer Project Standards tool.
If you are not bringing in a railing from another project you can create a new railing type in your project.
- Find the Railing category in the Project Browser and click the plus to expand it
- Right-Click one of the railing types and select Duplicate.

- Right-Click new railing type and choose rename. Give the new railing type a name you can remember.
- Right-Click the new railing type and select Type Properties to edit the railing type.
Now you are ready to make adjustments to the railing type to define a new railing. There are 2 main components to defining a railing type and 2 additional optional components that can be defined to the railing type.
- Rail Structure. These are the horizontal elements of the railing.
- Baluster Placement. This is the pattern of vertical elements of the railing.
- Top rail (optional)
- Handrail (optional)
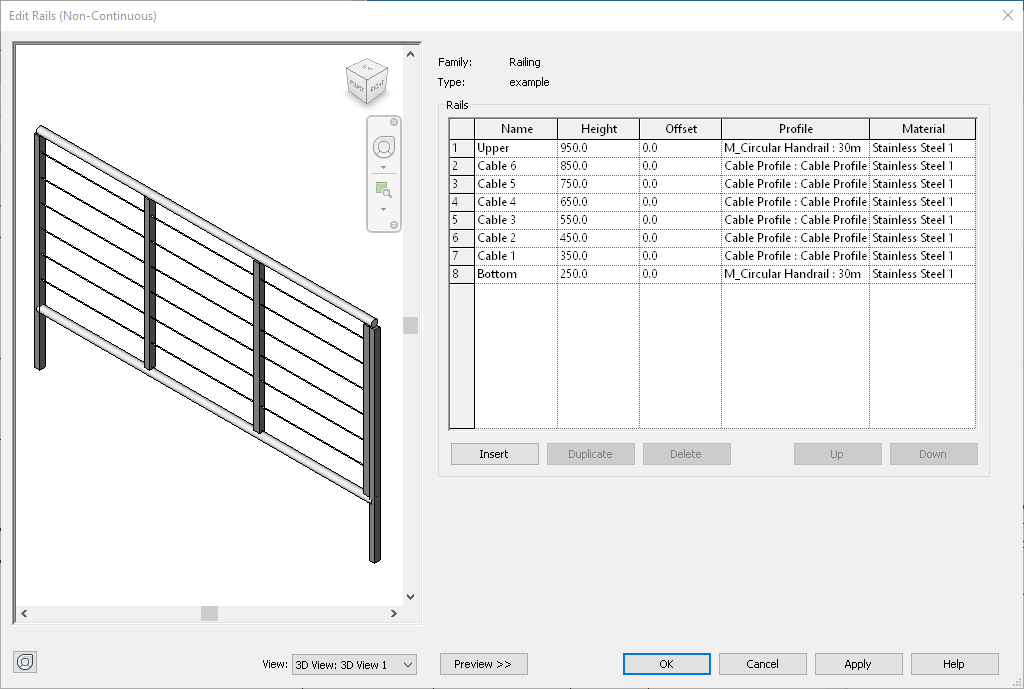
Rail Structure
Define the horizontal members of the railing in the Rail Structure dialog. each line of the rail structure table represents a horizontal member define the following for each row (horizontal member).
- Name - This can be any meaningful name to you. Names must be different for each row.
- Height - The height as measured from the railing host (floor, stair, etc...).
- Offset - This setting allows you to position horizontal elements to the left or right of the rail sketch line. If all of the elements are not exactly on top of each other in a vertical line use the offset value to position them.
- Profile - Profile family used to create the shape of the horizontal rail element. Profiles are 2d families that define the outline of an element. If you need a different shaped railing, you must first load the profile before it can be assigned in this dialog.
- Material - Each railing element can be defined a separate material.
In this example railing, an upper an lower railing have been defined using a circular profile and then between these 6 smaller cable profiles have been defined. In the Edit Rails dialog, you can use the preview pane to see the changes made to the rail structure and how they affect the overall railing family.
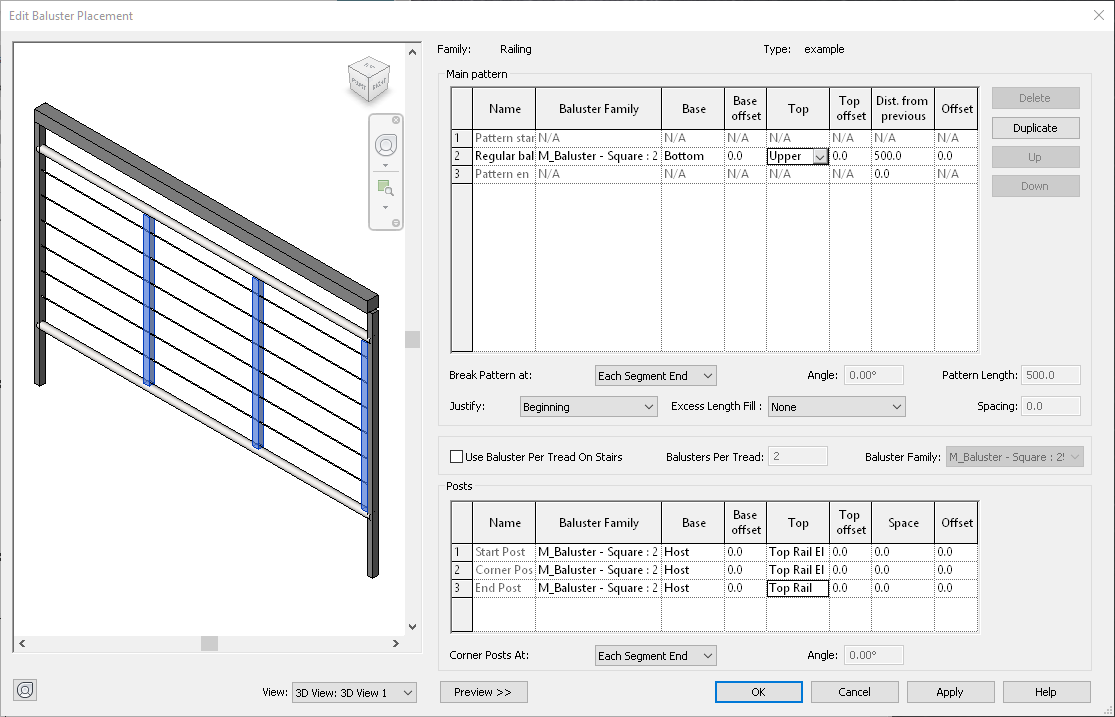
Baluster Placement
Balusters are the vertical elements in a railing. Define the pattern of the balusters in the baluster placement dialog. At the top of the dialog, the main pattern is established by defining baluster families to use in the pattern and some placement settings. Baluster families are separate loadable families and must be loaded into the project before they can be used in this dialog. In the dialog you can add different baluster families to create a complex pattern. For example you might load in 2 families and create an A,BB, A pattern. Define the following for each baluster in the pattern. Note a "baluster" in Revit may be a simple vertical member, but the family also could be created so it is wider and appears more like a panel. In Revit this would still be considered a "baluster", and needs to be defined as such in the pattern dialog.
- Name - This is any name you want to give to the baluster in the pattern.
- Family - The loadable family used for the baluster. If you need a baluster family for the pattern, it must be loaded before entering this dialog.
- Base - Lower position for the baluster family. Use the railing host (floor, roof, etc...) or a railing defined in the rail structure as a base for the baluster family. be careful to not define a base position that is higher vertically than the top position for the baluster, otherwise you will receive an error message and the baluster will not be created.
- Base Offset - Defines a vertical offset value for the base baluster position.
- Top - Highest point of the baluster. Use one of the rails defined in the rail structure for the top position.
- Top Offset - Defines a vertical offset for the top position of the baluster.
- Dist. from Previous - defines the spacing from one member fo teh patter to the next.
- Offset - Define an offset for the baluster position to the left or right of the railing sketch.
The lower section of the dialog uses similar settings but here you are defining the start, end, and corner posts of the railing. Depending on your needs these may be the same baluster families as the main pattern with similar settings, or may be totally different conditions at the start, end, and corners of the railing.
In the example below a simple pattern is defined of a baluster spaced every 500mm, with the top and bottom set between the main rails of the design. The ends and corners use the same baluster family but bottoms and top positions are set below and above the main raining pattern.
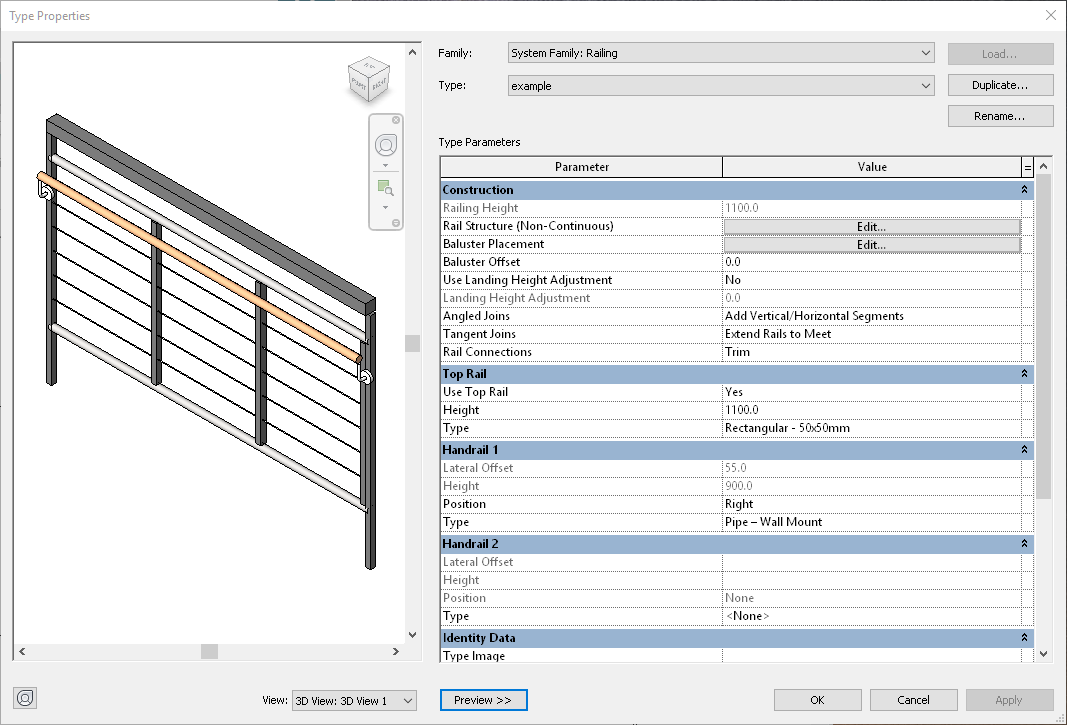
Top Rail & Hand Rail
In the type Properties dialog there are sections were you can add a top rail and/or a hand rail to the railing type. These 2 settings are not necessary but can give you added flexibility when creating you railing families. These allow you to "nest" a different kind of railing into the type to add complexity. In the example below a top rail with a rectangular profile is added and a handrail with a circular support and brackets have been added to the main railing type. Both Top rials and hand rails are separate railing type with node on the project browser, edits to these types are made in a separate type dialog.
Create common railing families in your project templates so thaty can easily be used in your projects, or create a project with common railing types you can cut and paste or transfer into your projects.


