|
In the previous lesson, you saw how you can increase productivity in Autodesk Inventor by implementing a plug-in built from a small amount of VB.NET code.
You will probably have heard the terms COM and .NET from Lesson 1 with reference to programming with Inventor. Both COM and .NET are technologies that enable communication between software: if you are interested in learning more, you will find information in the Additional Topics section here.
You will now look more closely at what happened when you executed the code in the previous lesson.
|
Provide Feedback: Please provide feedback about this Inventor Training or this lesson via email: myfirstplugin@autodesk.com
Lesson Downloads
|
What does it mean to “build” code?
The code that you typed in to Visual Studio 2017 Community in Lesson 1 was a set of human-readable instructions (source code) that needed to be converted into code that could be understood and executed by the computer. The “build” you performed did just that; it packaged up the resulting executable code inside a standard Windows EXE file. It’s also possible to create a DLL (Dynamic-Link Library) that can be loaded into Autodesk Inventor, but that’s a more advanced topic not covered by this guide.
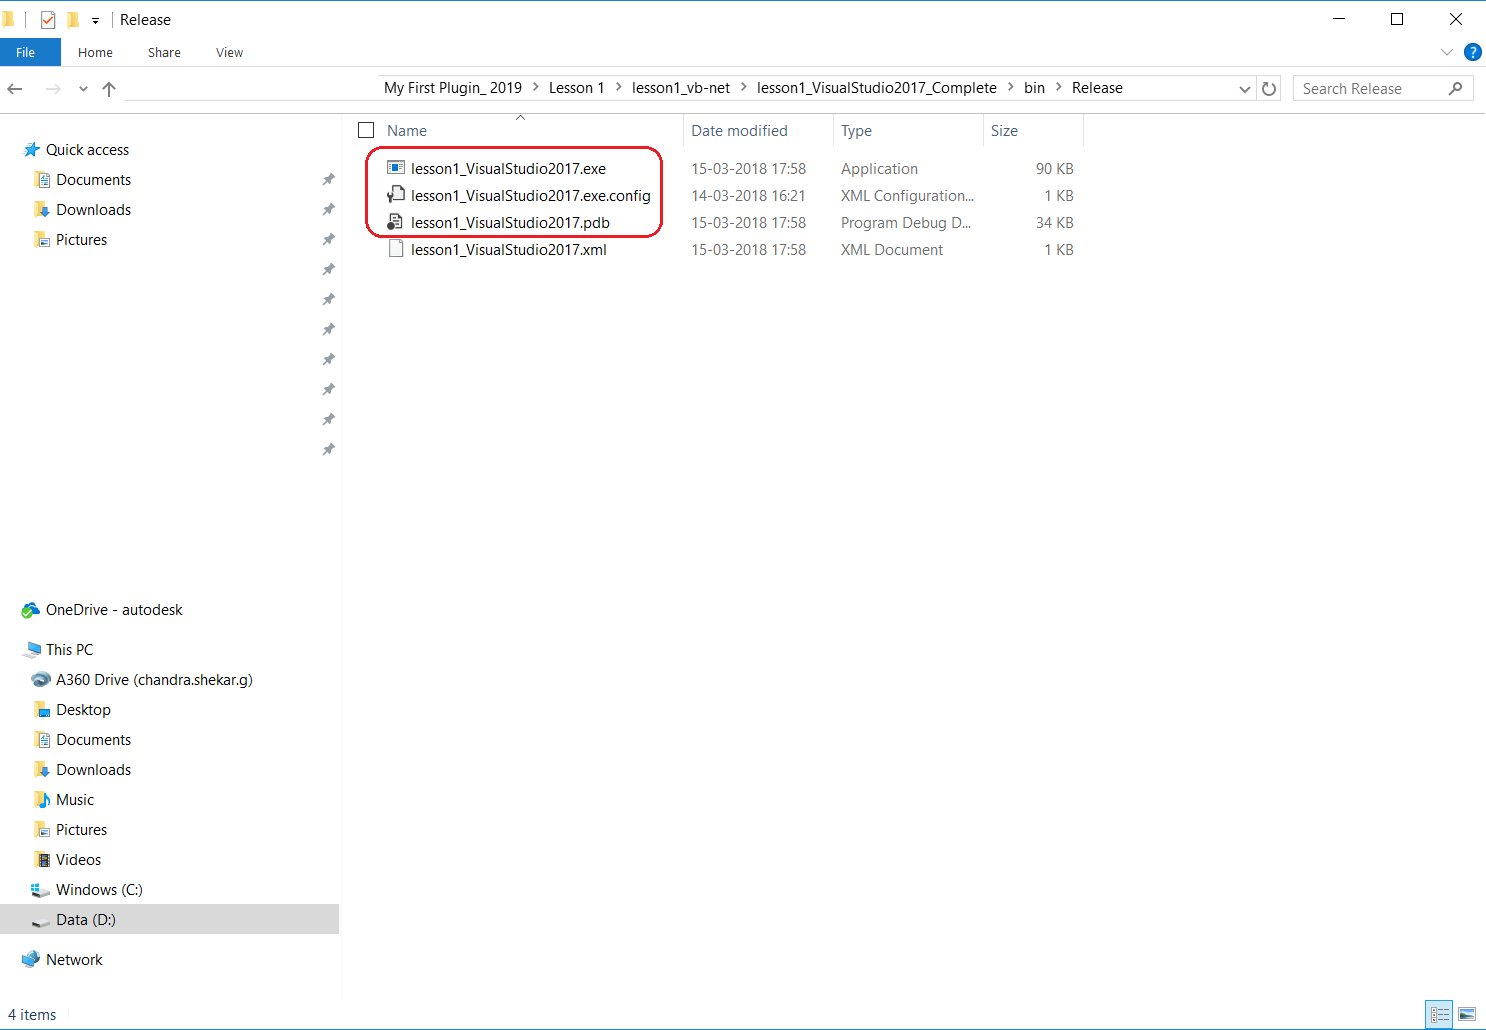
The following screenshot shows the output EXE along with the associated program debug database (which provides additional information when troubleshooting the EXE), once you have built the solution in Lesson 1 using Visual Studio 2017 Community. The path to which the EXE gets compiled is specified in the Visual Studio 2017 Community project settings and is set, by default, to the bin sub-folder of the Visual Studio 2017 Community project folder.
Choosing a Programming Language and Development Tool
Just as humans use different languages to communicate, you have various language options available to you when creating an Inventor plug-in: for the purposes of this guide we have chosen Visual Basic .NET (VB.NET), a strong general-purpose programming language that is popular with Inventor developers.
There are number of tools available for developing VB.NET code. They range from open source tools such as SharpDevelop to Microsoft’s flagship, professional development environment, Visual Studio. In your case you will be using Visual Studio 2017 Community, a free version of Visual Studio focused on building VB.NET applications.
Visual Studio 2017 Community is an Integrated Development Environment (IDE) because it is composed of various tools, menus and toolbars which ease the creation and management of your code.
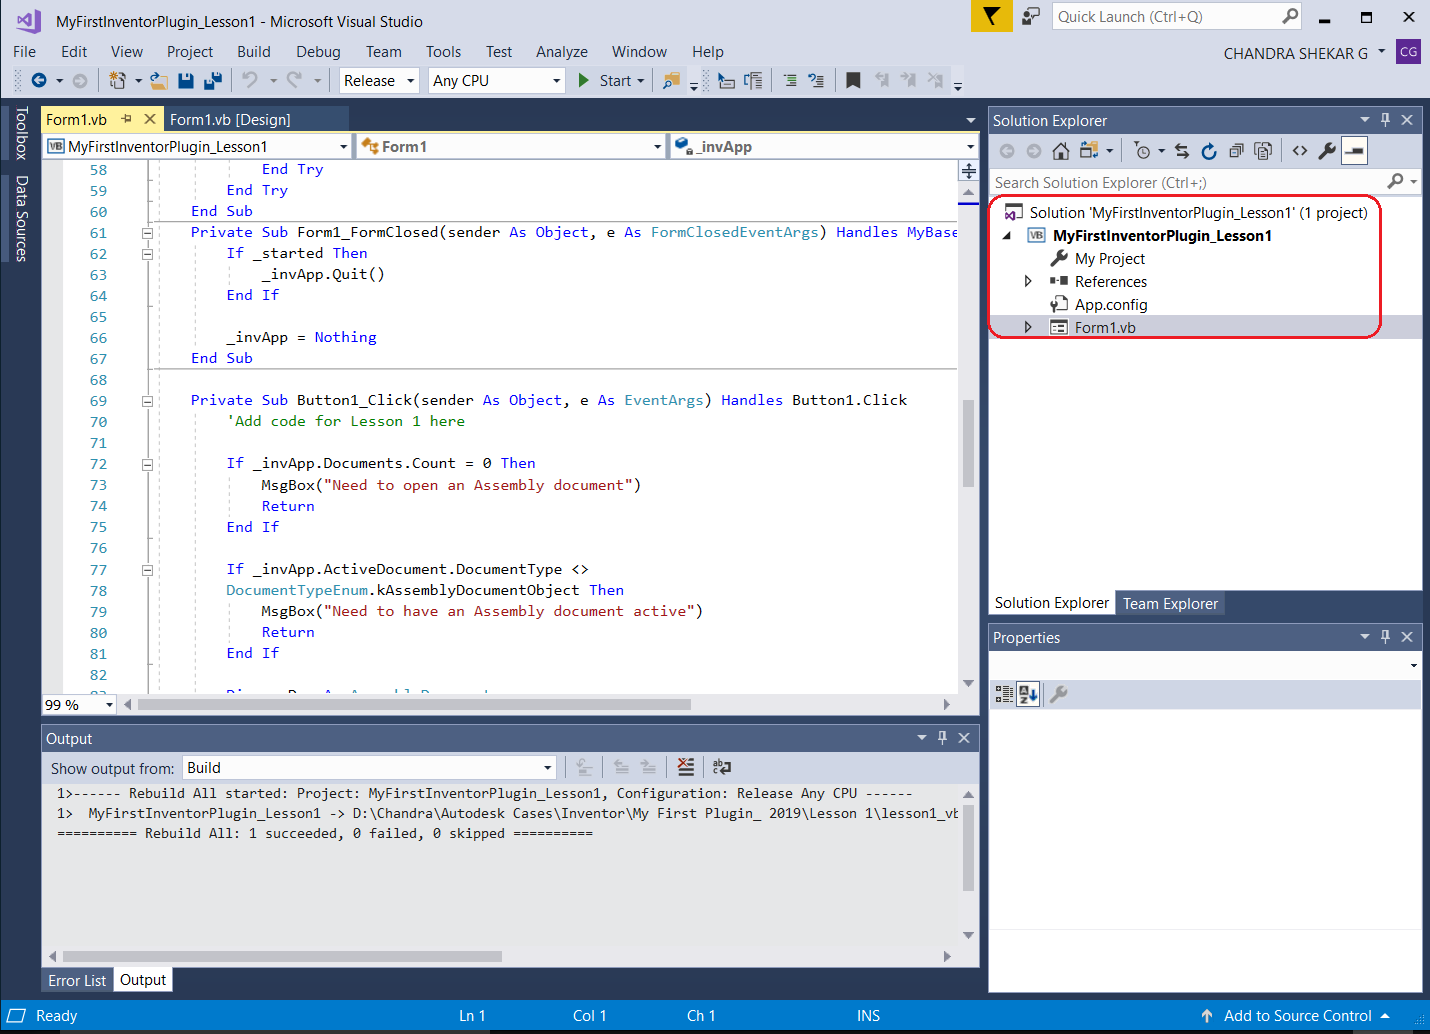
The project system in Visual Studio 2017 Community comprises Solution and Project files as well as Project Items, the individual files belonging to projects. A solution is a container for one or more projects. Each project can in turn be considered a container for project items – such as source files, icons, etc. – most of which get compiled into the resultant executable file (EXE or DLL). Visual Studio 2017 Community provides a Solution Explorer that organizes and displays the contents of the loaded solution in a tree-view format:
The Visual Studio 2017 Community interface also contains a text editor and an interface designer. These are displayed in the main window depending on the type of file being edited. The text editor is where you will enter the Visual Basic code for your Inventor plug-in. This editor provides advanced features such as IntelliSense and collapsible code sections along with the more classic text-editing features such as bookmarks and the display of line numbers.
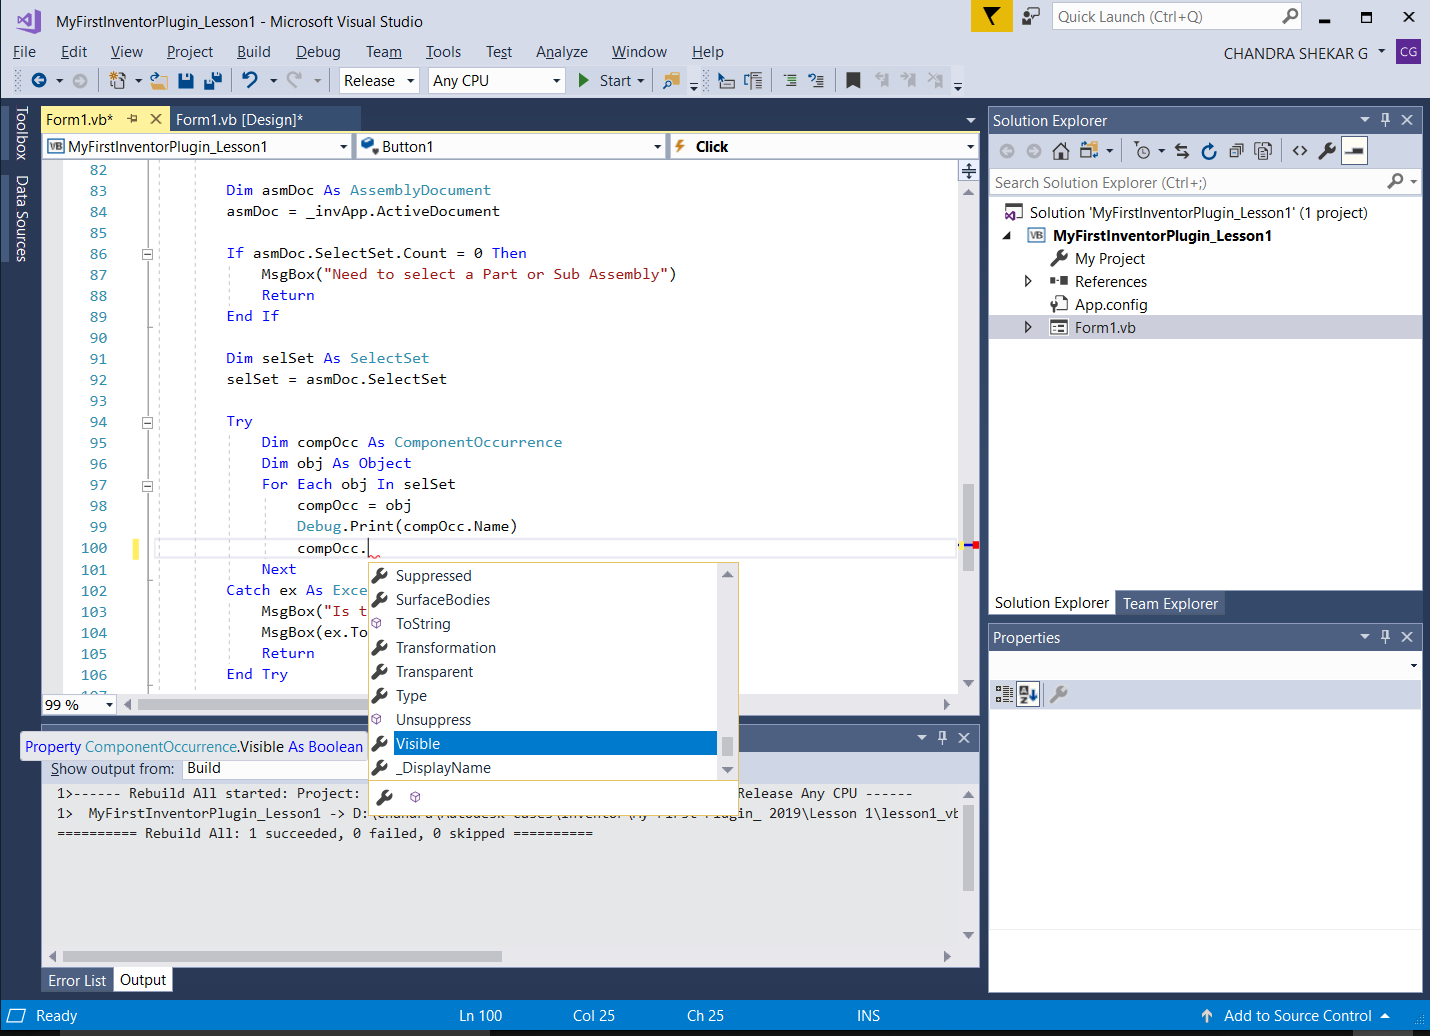
IntelliSense is an extremely valuable feature of the Visual Studio family that greatly improves programmer productivity: it automatically provides suggestions for the code being written based on the objects available and the letters that are being typed. IntelliSense showing the methods and properties for a ComponentOccurrence:
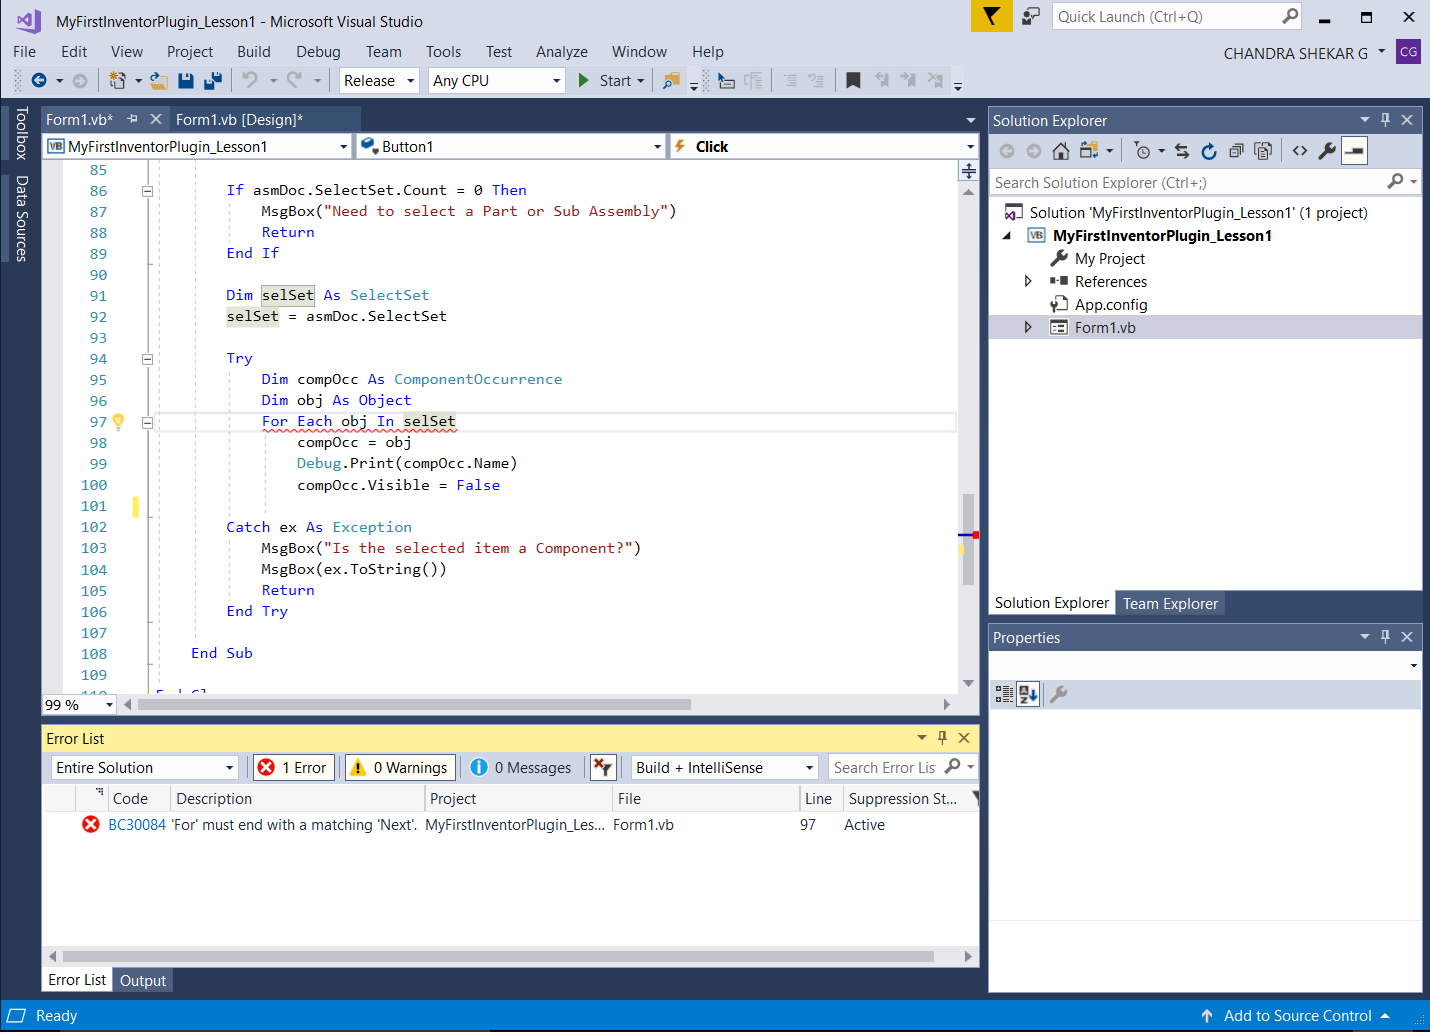
Clearly one of the key features of Visual Studio 2017 Community is its ability to build VB.NET code into an executable file. During the build process, the language compiler performs various checks and analyses on the code. One such check is to ensure the code conforms to the syntactical rules of the Visual Basic language. The compiler also performs various other checks, such as whether a variable has been appropriately defined or not. Detected errors are reported via the Error List Window, typically found at the bottom of the main window. The Error List can be displayed by selecting Error List from the View menu.
The Visual in Visual Studio Community
One of the main strengths of Visual Studio 2017 Community is its set of tools for creating a User Interface. When you create a new project, you can select a Windows Forms Application. When this template is used, the main window for the application is automatically created. This window is called a form and you can place user interface elements (called controls), such as a command buttons, on it. You add an element simply by selecting it in the Toolbox and then clicking and dragging it onto the Form. The Toolbox can be displayed using the View menu > Toolbox. Much of the code to make these elements work correctly gets added automatically to the project, greatly reducing the effort needed to get your application up and running.
Reviewing your use of Visual Studio 2017 Community
In this section, you will create a blank project like the one you were provided in Lesson 1. This project will be the starting point for Lesson 3.
- Create a Windows Forms Application:
Close the project from Lesson 1, if it is still open in Visual Studio 2017 Community, and then on the File menu, click New and then select New Project.
This will open a new dialog called New Project in which you have the option to select the template that will be used to create the plug-in application.

As you are working with Visual Studio 2017 Community, your installed templates are under the Visual Basic category.
In the center of the dialog, you can see various application templates that are available to you, the choice of which depends on the type of application you wish to create. As you’re creating a simple, standalone EXE with a dialog-based user interface, select the “Windows Forms Application” template.
You now need to select a name for your project. Enter MyFirstInventorPlug-in in the box near the bottom of the New Project dialog and select OK: The basic solution containing your project should now be created and loaded into the Visual Studio 2017 Community editor.
- View the references:
By default your blank project was created containing a few standard project references to core .NET components. You can see these references by right-clicking the project in the Solution Explorer and selecting Properties. In the Properties window select References.

Along with the standard references, a blank VB form is created and added to the project. It’s this form that gets displayed in the text editor window, Form1.vb. Forms have two views, Design and Code: you can switch between the two views by right-clicking on Form1.vb in the Solution Explorer and selecting View Code or View Designer.
- Add references:
So far you have created a blank Windows Forms Application project using Visual Studio 2017 Community.
This blank Windows Forms Application project, as created by Visual Studio 2017 Community, does not automatically make use of the Inventor API. For it to do so, you need to add a project reference to the interface DLL in Inventor describing its API, Autodesk.Inventor.Interop.dll.
In the Solution Explorer, right-click the project and choose Add Reference. Click the Browse tab in the Add Reference dialog and navigate to a location such as this beneath the installed location of Inventor on your system:
- C:\Program Files\Autodesk\Inventor 201x\Bin\Public Assemblies
Select Autodesk.Inventor.Interop.dll and then OK.
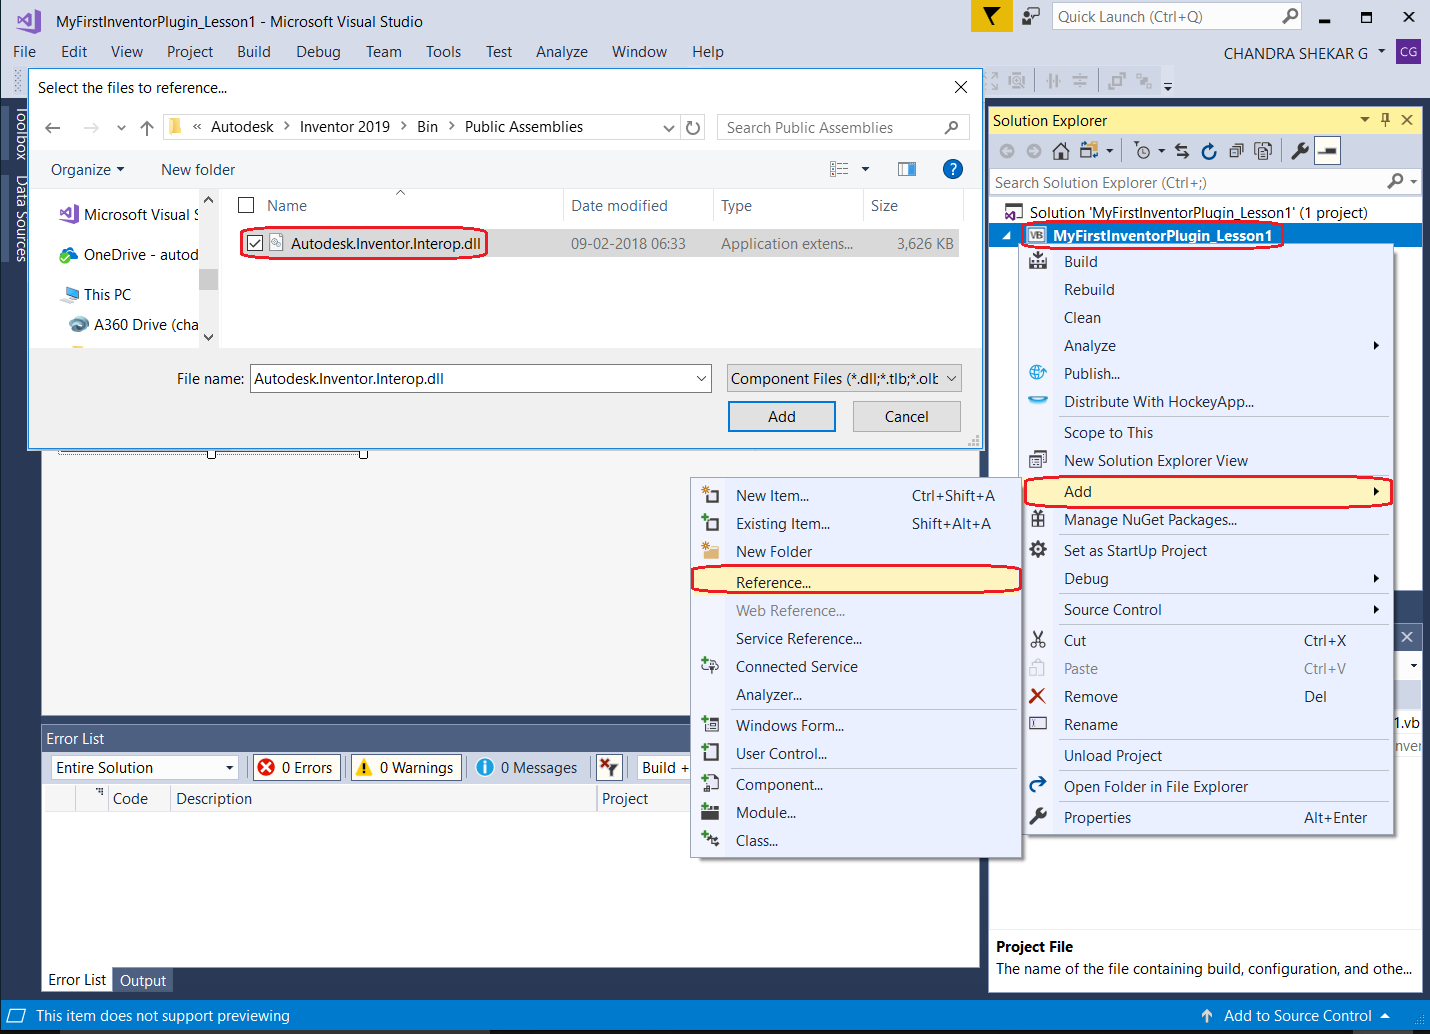
The Inventor API has now been referenced into your project.
- View Object Browser:
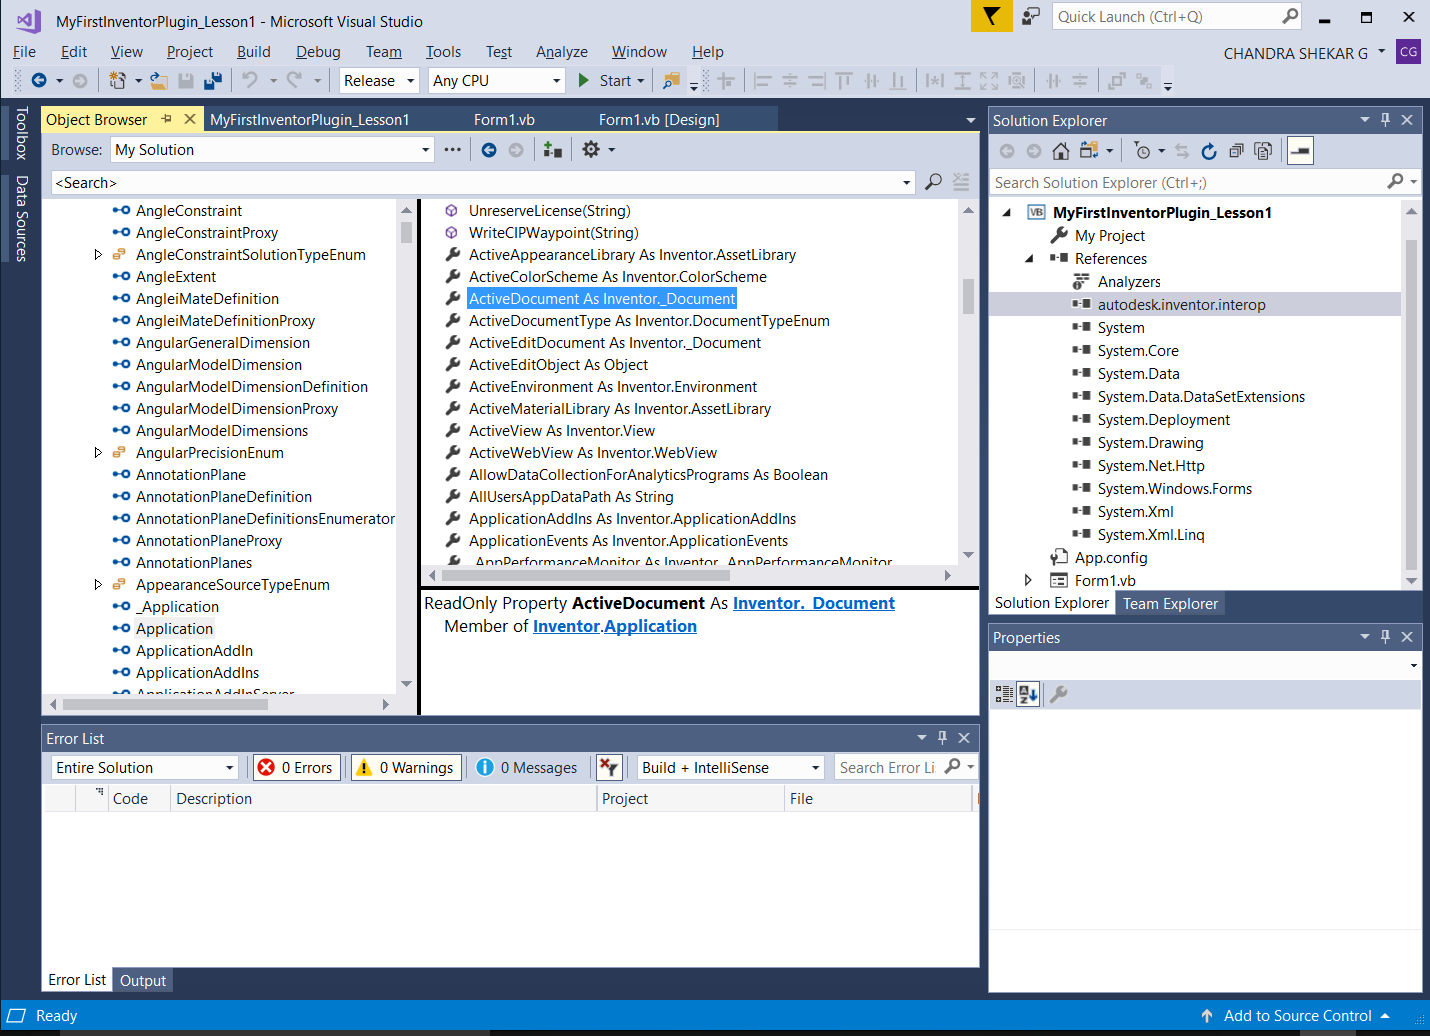
Before proceeding further, let’s use the Object Browser in Visual Studio 2017 Community. The object browser is a tool that can help you understand how to use the objects in the Inventor API. Once you have referenced the Inventor API (Autodesk.Inventor.Interop.dll) in your project its objects can be displayed in the Object Browser. The Object Browser is a dialog containing a tree showing how various components’ objects are organized. As well as using the tree to browse the hierarchy, you can also search on the name of an object to access it directly. Once you have the object displayed and selected in the left pane of the tree view, you can see its methods and properties in the right pane. In the screenshot below, the Application object is selected in the left pane and its ActiveDocument property is selected in the right from among the object’s various properties and methods. Try selecting other properties to see their details.
- Ready to add Inventor API code:
You’re now ready to use the Inventor API by entering code in Visual Studio 2017 Community. In other words, to provide instructions telling Inventor how to perform certain tasks.
- Build the project:
While developing code, it’s a good idea to build the solution, from time to time, to check whether errors have been introduced in the code. The code does not necessarily have to be complete or functional when building the solution. This approach can help avoid potentially lengthy troubleshooting once the code is complete, and has the side benefit of automatically saving any edited source files before the build starts.
To build a solution inside Visual Studio 2017 Community, select Build <ProjectName> from the Debug pull-down menu.
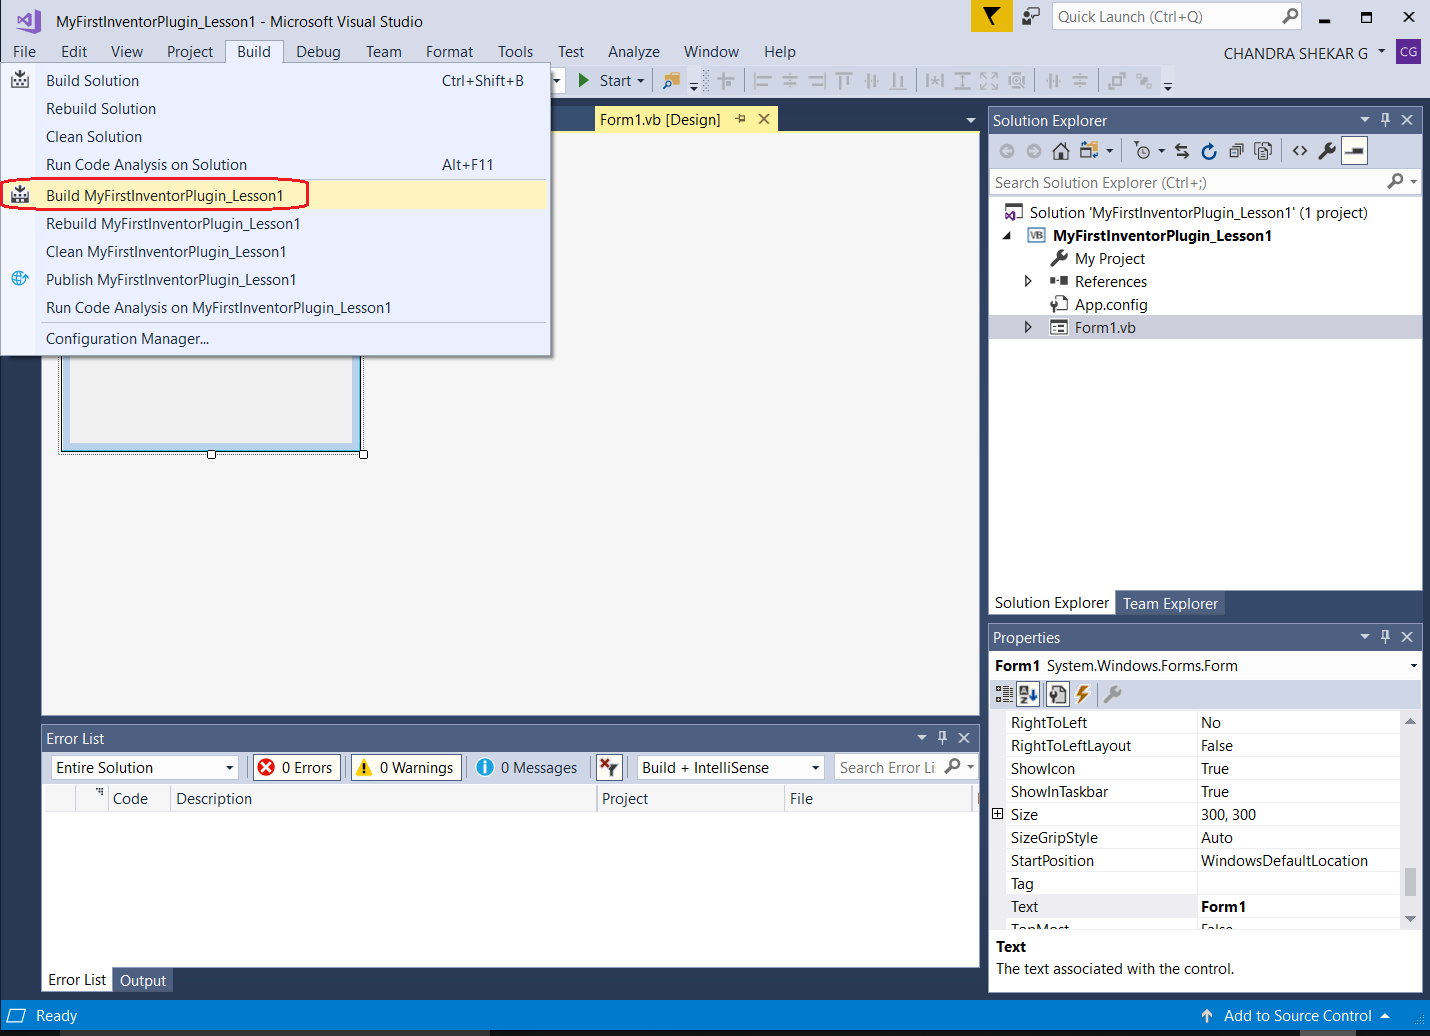
Tip: As a shortcut, you can use the Function key ‘F6’ to directly build the solution without accessing the menu.
If the build was successful, you will see Build Succeeded in the status bar at the bottom-left corner of the Visual Studio 2017 Community interface.
- Save the file:
On the File menu, click Save All. Saving the solution creates physical files representing the contents of your class library project on your computer’s hard drive, allowing you to open and edit it at another time in the future.
A quick recap: in this lesson you took a brief look at what happens when you build a project, as well as some background information on VB.NET and Visual Studio 2017 Community. You then spent some time creating a brand-new Windows Forms Application project in Visual Studio 2017 Community, adding the required project reference for it to be able to use the Inventor API.
Additional Topics
Visual Studio 2017 Community vs. Visual Studio 2017 Professional
In this guide, you are using Visual Studio 2017 Community. This is a free version of Visual Studio and a great tool to help you start writing and managing Visual Basic code for your Inventor plug-in without the need for an additional software investment. Microsoft has targeted Visual Studio 2017 Community at students, hobbyists and other part-time programmers. While they provide most of the features of Visual Studio Professional, such as IntelliSense, they do have certain limitations. For instance, Visual Studio 2017 Community contains fewer project templates and has limited options for debugging and troubleshooting your code. If you are serious about plug-in development beyond this introductory guide, we recommend investing in one of the more fully-featured members of the Visual Studio product family.
What is COM?
“Microsoft COM (Component Object Model) technology in the Microsoft Windows-family of Operating Systems enables software components to communicate. COM is used by developers to create re-usable software components, link components together to build applications, and take advantage of Windows services. COM objects can be created with a variety of programming languages. Object-oriented languages, such as C++, provide programming mechanisms that simplify the implementation of COM objects.” Source: MSDN Library
COM is the underlying API technology used by older versions of Visual Basic, including Visual Basic for Applications (VBA). While some Windows application developers have exposed .NET interfaces to their software, others have continued to invest in their COM interfaces, as these can also be called from .NET applications (see below for further information).
What is .NET?
The .NET Framework is a software framework that sits on top of the Microsoft® Windows® operating system* and provides the underlying platform, libraries and services for all .NET applications. The services generally include memory management, garbage collection, common type system, class libraries, etc.
* Subsets of .NET are also available on other operating systems, whether via the open source Mono project or via Microsoft® Silverlight®, but these are not topics for this guide: you will focus solely on the use of .NET in the context of Microsoft Windows.
What does the .NET Framework Contain?
The framework contains two main components:
- Common Language Runtime (CLR) – This is the agent (or execution engine) in the .NET Framework responsible for managing the execution of code. Which is why code written to target this runtime is also known as managed code. All managed code runs under the supervision of the CLR, but what does this mean? The CLR manages code by providing core services such as memory management (which includes automatically releasing the computer’s memory for reuse on other tasks when it is no longer needed), error (or exception) handling, managing the use of multiple threads of execution and ensuring rules around the use of different types of object are adhered to. The CLR is really the foundation of the .NET Framework.
- .NET Framework Class Library – As the name suggests, this is a library or collection of object types that can be used from your own code when developing .NET applications. These .NET applications are targeted for Windows (whether command-prompt based or with a graphical user interface), the web or mobile devices. This library is available to all languages using the .NET Framework.
As mentioned above, the CLR improves code robustness by making sure the executing code conforms to a common type system (CTS). The CTS ensures that all .NET (or managed) code – irrespective of the language – uses a similar set of object types and can work together in the same environment. It is this feature that makes it possible for you to write applications in the development language of your choice and yet make use of components/code written by programmers using other .NET languages.
Building Executables
When you built your code into an EXE, it was compiled into Common Intermediate Language (CIL – also known as MSIL) code using the language-specific compiler. CIL is a CPU-independent set of instruction that can be executed by the CLR on Windows operating systems. CIL is typically portable across 32- and 64-bit systems and even – to some extent – to non-Windows operating systems. The CIL code generated from your VB source code was then packaged into a .NET assembly. Such an assembly is a library of CIL code stored in Portable Executable (PE) format (which contains both the CIL and its associated metadata). Assemblies can either be process assemblies (EXEs) or library assemblies (DLLs).
During the course of this guide, you will focus on developing a particular type of Inventor plug-in: a process assembly (EXE) which communicates with Inventor. Because of the overhead associated with developing them, you will not spend time looking at Inventor AddIns, which are usually library assemblies (DLLs) that get loaded into and executed within the memory space of Inventor. One reason that implementing an EXE to work with Inventor is simpler than developing an AddIn is related to its user interface: Executables do not need to integrate seamlessly with the Inventor user interface by adding ribbon buttons (for instance).
Running Executables
During execution of a .NET assembly, CIL (residing in the assembly) is passed through the CLR’s just-in-time (JIT) compiler to generate native (or machine) code. JIT compilation of the CIL to native code occurs when the application is executed. As not all of the code is required during execution, the JIT compiler only converts the CIL when it is needed, thus saving time and memory. It also stores any generated code in memory, making it available for subsequent use without the need to recompile.
In the last step of this process, the native code gets executed by the computer’s processor.
If you would like more details on the process of building .NET applications, please refer to the MSDN Library.


