Note that as of v9, the Classification Manager for Revit has been replaced by the Standardized Data Tool for Revit.
The Classification Manager for Revit allows for some basic UI updates in the Import dialog. These settings are controlled by using an INI file.
File Setup
There is no INI file created by default. However the software will read an INI file with the name "ClassificationManager" located in the main program directory, C:\Program Files (x86)\Autodesk\BIT\[Revit Product Year].
Once the file is created, open the file and add the text "[Defaults]" this creates the heading that Classification Manager reads for the configuration settings.
Configurable Settings
Display public database in setup
By default the public database are configured to be shown. However, if you only want to show local databases, you can disable the display of the public databases by add the text below to the ini file under the heading Default.
ShowPudlicDBs=false
Display local library
Classification Maanger supports the ability to display a local library of databases (Excel files) within the Setup Open dialog. To add this information, add the below configuration under the Defaults heading with the directory path. Make sure that the path is not in quotes. See the sample for an example path.
LocalDbFolder=<path>
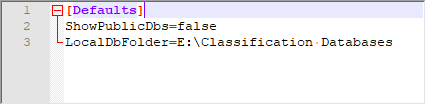
Sample
[Defaults]
ShowPublicDbs=true
LocalDbFolder=E:\Classification Databases


