
What:
Create 3D mesh objects from a set of photos using 3D photogrammetry.
Overview video:
Who:
Architects, 3D graphic designers, and content creators
How:
After taking several pictures from a terrestrial camera or an unmanned aerial vehicle (UAV), use Autodesk ReCap Photo to create unified 3D mesh objects.
See this tutorial to learn best practices for taking photos:
1. In Autodesk ReCap Photo dashboard, select Aerial or Object in the Create 3D frame.
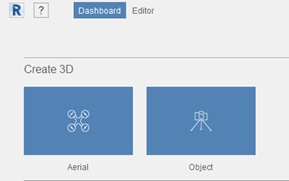
Note : If aerial photographs include GPS data, the 3D mesh model will be geolocated.
2.Upload 20 or more photos and click Create.
3. Enter a project name and click Start. After several minutes, you will receive an email telling you that the process is complete
4. In Autodesk Recap Photo, click the project thumbnail to download the project. After the download is complete, your project files appear in the My Computer section of the dashboard.

Note: The download time varies according to the number and size of the photos, and the time interval before your project is processed in the cloud.
Why:
Convert your photos to a high-quality 3D mesh model. Autodesk ReCap Photo creates meshes from photos, reducing the time and expense of manual model creation.
What next :
Migrate your new 3D mesh model to your favorite CAD or visualization software, such as Autodesk 3ds Max. You can also explore the model in an immersive way with Autodesk 3ds Max Interactive.


