Need help? Ask the Autodesk Assistant!
The Assistant can help you find answers or contact an agent.
What level of support do you have?
Different subscription plans provide distinct categories of support. Find out the level of support for your plan.
Autodesk Support
May 18, 2022
[This page has been updated to work with Revit 2025. If you are interested in previous versions, i.e., Revit 2023&2024, you can download the pdf version of the training materials from here ]
This is the last hands-on lesson of this guide, during which you will put the finishing touches on your plug-in’s functionality, making it usable in a real-world scenario.
In the last lesson, you used the Autodesk Revit API to calculate and display the center of the room containing the user-selected group. You then duplicated the group and placed it at the center of another room. During this lesson you’ll complete the plug-in’s functionality, extending it to allow the user to select multiple rooms to which the group will be copied.
Planning the New Functionality
Let’s start with a quick review of the main tasks covered during the previous lesson, looking at where and how to add this lesson’s tasks to the sequence.
a. Prompt the user to select the group to be copied
b. Calculate the center of the selected group
c. Find the room that contains the center of the group
d. Calculate the center point of the room
e. Display the x, y and z coordinate of the center of the room in a dialog box
f. Calculate the target group location based on the room’s center
g. Place the copy of the group at the target location
Your main task for this lesson is to prompt the user to select target rooms, information that is needed to place the copies of the selected group.
There are a couple of choices here: one way to do this would be to keep the user selection related functionality together at the beginning, making sure that the user has entered all the required information before you start your real work. Another would be to have the group information calculated first and then you add your new tasks of selecting multiple rooms. Here we will choose the latter option. As you really don’t need to display the room coordinates to the user in the final plug-in, you’ll remove that task and add your new tasks after that (in bold, below).
a. Prompt the user to select the group to be copied
b. Calculate the center of the selected group
c. Find the room that contains the center of the group
d. Calculate the center point of the room
e. Prompt the user to select the rooms to which the group will be copied
f. Place the group at the center of each of the selected rooms
Now that you have the overall plan in place, let’s look at the steps needed to implement this new functionality.
Coding the New Functionality
1) Re-open the C# project that you have created in Lesson 6 in Visual Studio, if you have closed it.
2) e. Prompt the user to select the rooms to which the group will be copied:
Start by adding a new type of filter class outside the implementation of the Class1 class.
// Filter to constrain picking to rooms
public class RoomPickFilter : ISelectionFilter
{
    public bool AllowElement(Element elem)
    {
        if (elem.Category?.Id?.Value == (int)BuiltInCategory.OST_Rooms)
        {
            return true;
        }
        else
        {
            return false;
        }
    }

    public bool AllowReference(Reference reference, XYZ position)
    {
        return false;
    }
}
You'll make use of this filter in the implementation of your Execute() method.
You no longer need to report the source room's center point to the user, so you can either remove or comment out the following lines of code. To comment out a block of code you can enclose the block in /* */, such as this:
/*

string coords = "X = " + sourceCenter.X.ToString() + "\r\n" + "Y = " + sourceCenter.Y.ToString() + "\r\n" + "Z = " + sourceCenter.Z.ToString();

TaskDialog.Show("Source room Center", coords);

*/
Beneath that add the code to prompt the user to select rooms, making use of your new RoomPickFilter class.
                // Ask the user to pick target rooms
                RoomPickFilter roomPickFilter = new RoomPickFilter();
                IList<Reference> rooms = sel.PickObjects(ObjectType.Element, roomPickFilter, "Select target rooms for duplicate furniture group");
3) Place the group at the center point of each of the selected room:
You'll start this task by implementing a new method in the Lab1PlaceGroup namespace. Add the following code to the “Class1” class within the Lab1PlaceGroup namespace:
/// Copy the group to each of the provided rooms. The position
/// at which the group should be placed is based on the target
/// room's center point: it should have the same offset from
/// this point as the original had from the center of its room
public void PlaceFurnitureInRooms(Document doc, IList<Reference> rooms, XYZ sourceCenter, GroupType gt, XYZ groupOrigin)
{
    XYZ offset = groupOrigin - sourceCenter;
    XYZ offsetXY = new XYZ(offset.X, offset.Y, 0);
    foreach (Reference r in rooms)
       {
         Room? roomTarget = doc.GetElement(r) as Room;
         if (roomTarget != null)
           {
             XYZ roomCenter = GetRoomCenter(roomTarget);
             Group group = doc.Create.PlaceGroup(roomCenter + offsetXY, gt);
            }
        }
 }
Now you need to edit your Execute() method to make use of this method to place copies of the selected group in each of the selected rooms.
You no longer need the next two lines of code. You can either remove them or comment them out:
             // XYZ groupLocation = sourceCenter + new XYZ(20, 0, 0);
            // doc.Create.PlaceGroup(groupLocation, group.GroupType);
Add the following statement, in place of the above, which calls your new method:
PlaceFurnitureInRooms(doc, rooms, sourceCenter, group.GroupType, origin);
The resulting code fragment should now look like this:
// Place furniture in each of the rooms
    Transaction trans = new Transaction(doc);
    trans.Start("Lab");
    PlaceFurnitureInRooms(doc, rooms, sourceCenter,group.GroupType, origin);
    trans.Commit();
This completes the code for this lesson and for your plug-in. The complete code for this lesson is also provided for download at the top of this lesson. It can be useful to see the complete code to compare your results and ensure they are correct.
4) Save the file:
On the File menu, click Save All.
5) Build the project:
Note: If Revit 20xx is already running, please close it.
Inside Visual Studio, in the Build menu, click Build Solution to compile and build your plug-in. If the code builds successfully, you will see the Build succeeded message in the status bar of Visual Studio.
Running the Plug-in
The steps to run the command are similar to those used in prior lessons.
1. Start Autodesk Revit 20xx.
2. Open the Hotel.rvt Project file.
3. Start the command Lab1PlaceGroup.
4. Select the group in Room 1, as you did in the previous lesson.
5. Select multiple rooms to where you would like the selected group to be copied.
The selected group should be copied to the same relative position in each of the selected rooms.
A Closer Look at the Code
Let's now take a closer look at the implementation details for the tasks you have added during this lesson.
The first of these tasks deals with asking the user to select a set of rooms.
IList<Reference> rooms = sel.PickObjects(ObjectType.Element, roomPickFilter, "Select target rooms for duplicate furniture group");
You have already used PickObject() and PickPoint() in previous lessons, to select a single object (i.e. a Group) and a point, respectively.
Based on the naming convention of these methods, let's now discover what other selection methods are available to you. If you open the RevitAPI.chm file (the Revit API Help Documentation) and search with the keyword *Pick*, you will find a list of methods, one of which is called PickObjects(). As you can see from the description of this method, it is exactly what you're looking for:
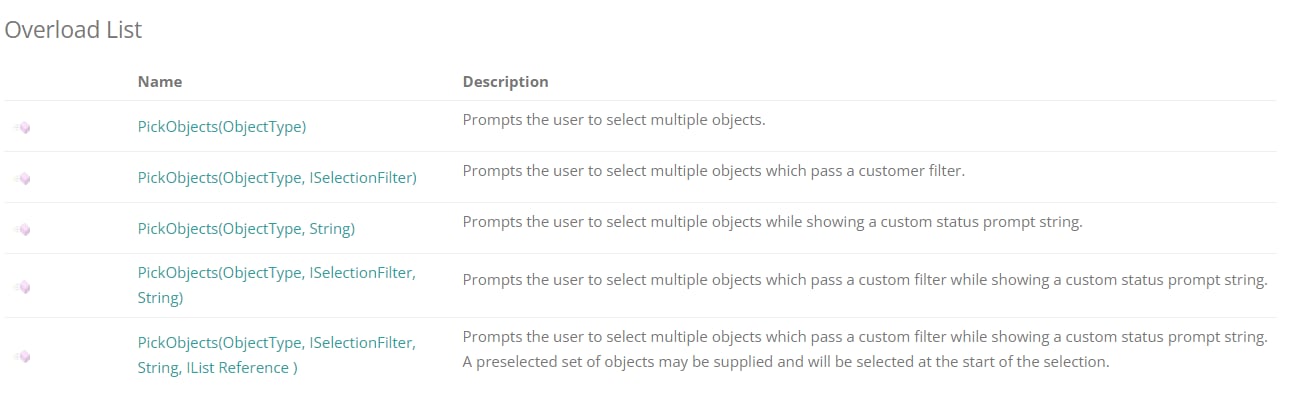
As you can see, there are five different forms of PickObjects() (you may recall from looking at the PickObject() method that this is known as function overloading). As with your use of PickObject(), it's the fourth version that appears to be of most interest, as it allows us to use a selection filter and to display a prompt string to the user.
Click on the link for the fourth method to show you the details of this overload:
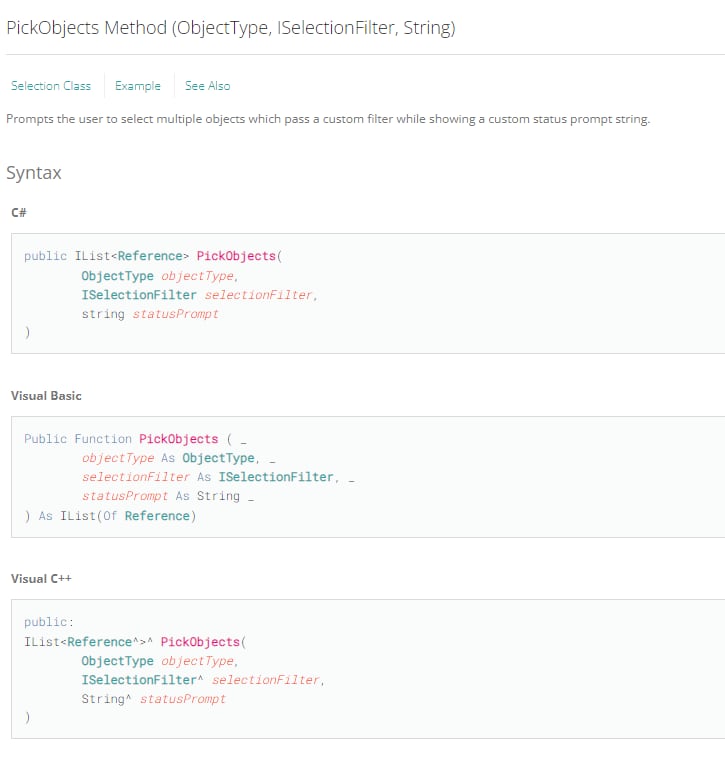
As you can see from the method's signature, it returns an IList of Reference objects. IList is a generic list class defined in the System.Collections.Generic namespace which can be specialized to contain a specific type of object – in this case instances of the Revit API's Reference class. You therefore declared a variable of type IList to which you assigned the results of the call to the PickObjects() method.
Before going ahead and calling this method, you needed to implement another selection filter, similar to the one you created previously for Group selection.
Here's the definition of your selection filter class limiting selection to Room objects:
  public class RoomPickFilter : ISelectionFilter
  {
       public bool AllowElement(Element elem)
        {
           if (elem.Category?.Id?.Value == (int)BuiltInCategory.OST_Rooms)
             {
               return true;
            }
           else
           {
               return false;
           }
        }

       public bool AllowReference(Reference reference, XYZ position)
       {
          return false;
      }
 }
This class is very similar to the one you created previously: the changes are with the name – this one is called RoomPickFilter – and the category ID upon which to filter (OST_Rooms).
Back in the Execute() method, you created a RoomPickFilter before calling the PickObjects() method.
RoomPickFilter roomPickFilter = new RoomPickFilter();
In the next statement, which is spread over multiple lines, you declared your reference list and assigned the results of the PickObjects() call to it:
IList<Reference> rooms = sel.PickObjects(ObjectType.Element,roomPickFilter, "Select target rooms for duplicate furniture group");
The first line contains the left-hand side of the assignment, specifying the name (rooms) and the type (IList<Reference>) of your variable. The subsequent lines call the function, passing the required parameters to it.
The second task in this lesson was to place a new group in each of the selected rooms. This involved looping through each of the rooms, calculating the center point and placing a new group relative to that point.
Here's the new method performing that task:
public void PlaceFurnitureInRooms(Document doc,IList<Reference> rooms,XYZ sourceCenter,GroupType gt,XYZ groupOrigin)
  {
         XYZ offset = groupOrigin - sourceCenter;
         XYZ offsetXY = new XYZ(offset.X, offset.Y, 0);
             foreach (Reference r in rooms)
                 {
                      Room? roomTarget = r.Element as Room;
                      if (roomTarget != null)
                             {
                                 XYZ roomCenter = GetRoomCenter(roomTarget);
                                Group group = doc.Create.PlaceGroup(roomCenter + offsetXY, gt);
                             }
               }
  }
In the lines directly after the method's signature – where you defined the parameters being passed in – you defined two variables, offset and offsetXY. The offset variable holds the difference between the group's origin and the center of the room in which the group is located. This gives you an offset you can use to position each of the new groups relative to its target room's center. As you want the group to maintain the same level as the target room, you only care about X and Y offsets. This is the offset that you applied when placing your new groups.
The next statement was your foreach loop. You took each item from the list of rooms, in turn, and did something with it.
Inside the foreach loop, you first performed a cast on each Reference from the list, to be able to treat it as a Room. You did this using the "as" keyword, which – as you know – will return null if the object is not actually a Room. It's for this reason that you then used an if statement to make sure you actually have a Room to work with before proceeding (i.e. if it is not null, as "!=" means "is not equal to").
Assuming you have a valid Room, you then used the GetRoomCenter() method from the previous lesson to get the room's center, stored it in the roomCenter variable, and placed the group at the appropriate offset from the center of the target room (roomCenter + offsetXY).
With your new PlaceFurnitureInRoom() method implemented, it remained simply to update the Execute()method to make use of it.
Instead of your previous call to PlaceGroup(), you changed the code to call PlaceFurnitureInRoom(), passing in the required parameters.
// Place furniture in each of the rooms
      Transaction trans = new Transaction(doc);
      trans.Start("Lab");
      PlaceFurnitureInRooms( doc, rooms, sourceCenter,group.GroupType, origin);
      trans.Commit();
This brings you to the end of this lesson and to the practical section of this guide.
Congratulations! You have just completed all the lessons in this guide. You have completed the journey from being a Revit product user to learning the basics of programming, getting a first look at the Revit API and creating your first real-world plug-in for Revit.
All that remains is to take a look at some of the resources you will find useful during your onwards journey with the Autodesk Revit API. We wish you all the very best!
Was this information helpful?
The Assistant can help you find answers or contact an agent.
What level of support do you have?
Different subscription plans provide distinct categories of support. Find out the level of support for your plan.