Need help? Ask the Autodesk Assistant!
The Assistant can help you find answers or contact an agent.
What level of support do you have?
Different subscription plans provide distinct categories of support. Find out the level of support for your plan.
Autodesk Support
May 18, 2022
[This page has been updated to work with Revit 2025. If you are interested in previous versions, i.e., Revit 2023&2024, you can download the pdf version of the training materials from here ]
Over the next two lessons you will modify your command to copy the group to the same relative position in other rooms selected by the user. In this lesson you’ll focus on the first part of this, to copy your selected group to a location relative to the center of the room it is in. You’ll then extend that in the next lesson to allow selection of multiple rooms, copying the group to the same relative position in each room.
Planning out the New Functionality
When the PlaceGroup() method inserts a group, it places the center of the group at the target location. For the purposes of this lesson, you’re going to specify this location as being a fixed displacement from the center of the room containing the original group. You’ll end up with a new group at the right location in the target room by setting its displacement to the difference in position between the source and target rooms.
A big part of this process will be to find the room containing a particular group. For the sake of simplicity, you will assume that the selected group is completely enclosed by a room: it should not span two or more rooms. You will then look for the room that contains the group’s center point. You will calculate the center point of that room and the copied group’s target location at a fixed displacement from it. Finally, you will place the copy of the selected group at this location.
Here are the tasks you implemented in the previous lessons:
a. Prompt the user to select the group to be copied
b. Prompt the user to select the target location for this copy
c. Place the copy of the group at the target location
To implement the proposed enhancements, there are new tasks (in bold) to be added to the list above. Task b in the above list is no longer needed, as the group will now be placed using different logic.
a. Prompt the user to select the group to be copied
b. Calculate the center of the selected group
c. Find the room that contains the center of the group
d. Calculate the center of the room
e. Display the x, y and z coordinate of the center of the room in a dialog box
f. Calculate the target group location based on the room’s center
g. Place the copy of the group at the target location (some modification needed)
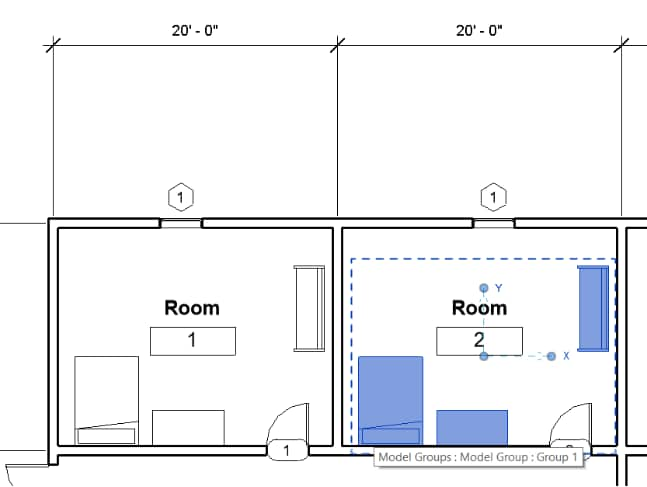
As you can see from the above list, you’re going to need to calculate the center point for both the Group and the Room objects. To do so, you will calculate the center point of their respective bounding boxes. As an example, in the following picture the dashed blue line is the bounding box of a selected group, while the blue dot in the middle is its center point.
Both the Group and the Room classes provide a BoundingBox property. They do so because they are derived from the Element class, and the Element class has this property. The Group and Room classes are said to inherit this property from their parent class. Because of this shared ancestry, you can implement a function which works for both the Group and the Room objects (and for any Element object, for that matter).
An Element’s BoundingBox property returns a BoundingBoxXYZ object containing the minimum and maximum points of its geometry. You can calculate the center point from these two points by taking the point halfway between them.
To get the room that contains the selected group, you first need to get all rooms in the model and then go through each one, checking whether it contains the selected group’s center point. You will calculate the center point of the room containing the group in the same way as you did for the group itself.
Coding the New Functionality
Type the following code fragment inside the class Class1, making sure it is outside the Execute()method. The code defines a new method, GetElementCenter(), which takes an Element as a parameter and returns its center.
Return the center of an element based on its BoundingBox.
public XYZ GetElementCenter(Element elem)
              {
                 BoundingBoxXYZ bounding = elem.get_BoundingBox(null);
                 XYZ center = (bounding.Max + bounding.Min) * 0.5;
                 return center;
             }
In the Execute() method, after the line where you get the selected group, type the lines of code highlighted below in bold. The new statement calls your new GetElementCenter() method to get the center point of the selected group.
                 Group? group = elem as Group;
                 if (group == null)
                  {
                    message = "Unable to obtain a group";
                    return Result.Failed;
                  }
                 // Get the group's center point
                 XYZ origin = GetElementCenter(group);
Add the following line toward the top of code right after: “using Autodesk.Revit.UI.Selection;”
using Autodesk.Revit.DB.Architecture;We are going to use Room object defined in this name space.
Type the following code fragment inside the class Class1, making sure it is outside any existing method implementations. This code defines a new GetRoomOfGroup() method, which takes a Document and a point as parameters and returns the Room in which the specified point lies.
/// Return the room in which the given point is located

 Room? GetRoomOfGroup(Document doc, XYZ point)
    {
       FilteredElementCollector collector = new FilteredElementCollector(doc);
       collector.OfCategory(BuiltInCategory.OST_Rooms);
            Room? room = null;
            foreach (Element elem in collector)
            {
                room = elem as Room;
                if (room != null)
                {
                    // Decide if this point is in the picked room
                    if (room.IsPointInRoom(point))
                    {
                        break;
                    }
                }
            }
            return room;
      }
Back in the Execute() method, after the line, GetElementCenter(), which you added in the last step, type the lines of code highlighted below in bold. The new statement calls your new GetRoomOfGroup() method to find the room containing the center of the selected group. If no room is found (room is null), it sets an error message and returns a failure result.
         // Get the group's center point
          XYZ origin = GetElementCenter(group);

          // Get the room that the picked group is located in
          Room? room = GetRoomOfGroup(doc, origin);
          if (room == null)
          {
            message = "Could not find a room for the indicated group";
            return Result.Failed;
          }
Type the following code fragment inside the class “Class1”, once again making sure the code is outside any existing methods. The code defines a new GetRoomCenter() method, which takes a Room and – as the name suggests – returns its center point. You use the previously defined GetElementCenter() to calculate this, but you modify the Z coordinate of the point you return to make sure it’s on the floor of the room.
                /// Return a room's center point coordinates.
                /// Z value is equal to the bottom of the room
                public XYZ GetRoomCenter(Room room)
                   {
                         // Get the room center point.
                        XYZ boundCenter = GetElementCenter(room);
                        LocationPoint locPt = (LocationPoint)room.Location;
                        XYZ roomCenter = new XYZ(boundCenter.X, boundCenter.Y, locPt.Point.Z);
                        return roomCenter;
                   }
In the Execute() method, after the statement which finds the room containing the center point of your group, type in the lines of code highlighted in bold, below. The code gets the room’s center point and displays it to the user via a task dialog (a type of dialog that uses the Autodesk Revit user interface style).
// Get the room that the picked group is located in
Room? room = GetRoomOfGroup(doc, origin);
if (room == null)
{
message = "Could not find a room for the indicated group";
return Result.Failed;
}
// Get the room's center point
XYZ sourceCenter = GetRoomCenter(room);
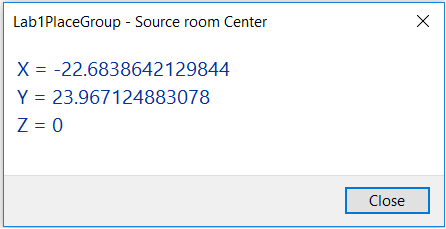
string coords =
"X = " + sourceCenter.X.ToString() + "\r\n" +
"Y = " + sourceCenter.Y.ToString() + "\r\n" +
"Z = " + sourceCenter.Z.ToString();
TaskDialog.Show("Source room Center", coords);
The first argument of TaskDialog.Show() is the name of which should appear in the title bar at the top of the dialog.
Remove or comment out the current PlaceGroup() call in the Execute() method and replace it with the following lines in bold. Your new group will be placed at a displacement of (20, 0, 0) in feet from the center point of the original group’s room (20 feet is the width of the two rooms and therefore the horizontal distance between their center points). As both sourceCenter and new XYZ(20,0,0) are of type XYZ, they can be added together to get the new location coordinates.
doc.Create.PlaceGroup(point, group.GroupType);
     // Calculate the new group's position
      XYZ groupLocation = sourceCenter + new XYZ(20, 0, 0);
      doc.Create.PlaceGroup(groupLocation, group.GroupType);
This completes your code for this lesson. The complete code for this lesson is also provided for download at the top of this lesson. It can be useful to see the complete code to compare your results and ensure they are correct.
On the File menu, click Save All.
Running the Plug-in
The steps to run the command are similar to those used in prior lessons.
You will see the following task dialog showing the coordinates of the room’s center.
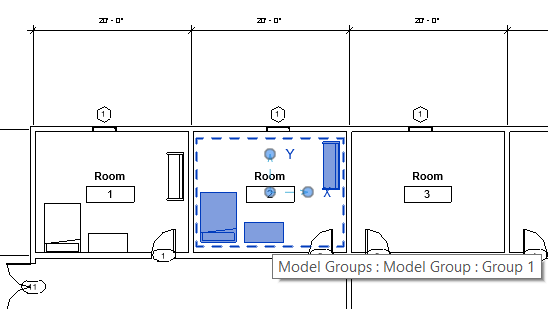
Click the Close button. Following this, a new group should be inserted into Room 2. Because the displacement of (20,0,0) is the vector from the center of Room 1 to the center of Room 2, the group appears to be copied from Room 1 to the same relative location in Room 2.
A Closer Look at the Code
Let's now take a closer look at the code. You'll start by looking at your new methods, before looking at the changes to the command's Execute() method.
You defined the GetElementCenter() method as follows:
public XYZ GetElementCenter(Element elem)
                          {
                             BoundingBoxXYZ bounding = elem.get_BoundingBox(null);
                             XYZ center = (bounding.Max + bounding.Min) * 0.5;
                             return center;
                          }
In the implementation of the GetElementCenter() method, you started by accessing the BoundingBox property of the Element passed in, storing its value in a variable named bounding.
BoundingBoxXYZ bounding = elem.get_BoundingBox(null);
The BoundingBox property is slightly unusual in that it takes a parameter: the view for which the bounding box is to be calculated. If this parameter is null, the property returns the bounding box of the model geometry. If a property of a class takes one or more parameters, the get_ prefix is needed before the property name to read the property value. This prefix isn't needed if the property doesn't take any parameters: you can just use the property name.
The returned BoundingBoxXYZ contains the coordinates of the minimum and maximum extents of the Element's geometry. The center point is calculated by taking the average (or mid-point) of these two points. For the sake of clarity, you stored this in another variable named center.
XYZ center = (bounding.Max + bounding.Min) * 0.5;
Finally, you returned this center point from the function.
You defined GetRoomOfGroup() method as follow:
Room? GetRoomOfGroup(Document doc, XYZ point)
        {
            FilteredElementCollector collector = new FilteredElementCollector(doc);
            collector.OfCategory(BuiltInCategory.OST_Rooms);
            Room? room = null;
            foreach (Element elem in collector)
            {
                room = elem as Room;
                if (room != null)
                {
                    // Decide if this point is in the picked room
                    if (room.IsPointInRoom(point))
                    {
                        break;
                    }
                }
            }
            return room;
        }
Let's now take a closer look at the implementation of the GetRoomOfGroup() method. In this method, you started by retrieving all the rooms in the document, going through them to find the room that contains the group. The FilteredElementCollector class helped you with this task: it collects elements of a certain type from the document provided. That's why you needed to pass a document parameter to the GetRoomOfGroup() method, so it can be used there.
FilteredElementCollector collector =new FilteredElementCollector(doc);
The collector object is now used to filter the elements in the document. In the next step you added a filter requesting that only rooms be collected.
collector.OfCategory(BuiltInCategory.OST_Rooms);
You added your category filter to the collector using the OfCategory() method. Once the filter was applied, the collector only provided access to rooms. The FilteredElementCollector class provides several methods to add filters (and multiple methods can be applied at the same time for more complex requirements). More information on adding filters is provided later in this lesson in the Additional Topics section.
You then iterated through each room in the collector using a foreach expression. The code between the braces is repeatedly executed on each of the elements found by the collector. While you know these elements will be rooms, at this stage you accessed them as generic elements, as that's how the FilteredElementCollector provides access to them.
foreach (Element elem in collector)
                  {
                      //code between braces pair executed repetitively.
                  }
The elem variable represents the current element in the collector. So when the code in the body of the foreach statement gets executed for the first time, the elem variable contains the first room. When the code in the body of the foreach statement is executed again, this time the elem variable contains the second room. And so on until you have executed the code against each of the rooms collected from the document.
As mentioned before, the collector provides you with access to each element it contains an instance of the generic Element class. As you know your elements will actually be instances of the Room class, you needed to cast them to that type before being able to access the functionality you needed from them (i.e. the IsPointInRoom() method).
room = elem as Room;
As you may recall, the as keyword first checks the actual type of the object before performing the type conversion: if the object is not of type Room, the variable will be set to null. Even though you fully expected the collector only to return rooms, it's still good practice to double-check that the room variable contains a valid room, just in case.
if (room != null) { }
The above if statement performs a conditional operation. If the condition provided between the brackets evaluates to true, the subsequent code block gets executed. An optional else clause can be used to execute different code when the condition evaluates to false (although this particular statement does not have one). The if statement is a very important programming concept, so we have provided more information on its use in the Additional Topics section.
As implied by its name, the IsPointInRoom() method judged whether the specified point is inside the boundaries of the room. If it was inside, the method returned true, otherwise false. You called IsPointInRoom() on each room: as soon as it returned true for a particular room, you knew you had found the one that contained your point and so you did not need to check the others. You then used a break statement to escape the iteration, even though there may well have been rooms that had not yet been checked. The break statement stops execution of code in the enclosing loop (in this case the foreach) and starts executing the code following it.
                    // Decide if this point is in the picked room
                    if (room.IsPointInRoom(point))
                    {
                        break;
                    }
On completion of the loop, the room variable either contains the room in which the point was found – if IsPointInRoom() succeeded for it – or the last room in the list of rooms, otherwise. In either case, the contents of this variable gets returned as the result of the GetRoomOfGroup() method.
return room;You defined GetRoomCenter() method as follows:
                   /// Return a room's center point coordinates.
                   /// Z value is equal to the bottom of the room
                   public XYZ GetRoomCenter(Room room)
                   {
                          // Get the room center point.
                         XYZ boundCenter = GetElementCenter(room);
                         LocationPoint locPt = (LocationPoint)room.Location;
                         XYZ roomCenter = new XYZ(boundCenter.X, boundCenter.Y, locPt.Point.Z);
                        return roomCenter;
                   }
Let's now take a closer look at the implementation of the GetRoomCenter() method. This function is internally going to make use – once again – of your GetElementCenter() method, modifying the returned point to make it at the same level as the floor of the room.
In order to make sure this point is adjusted to be at the elevation of the Room, you needed to access the Room's location point. The location point of a Room is always on its floor, so you determined its elevation by checking the location's Z coordinate.
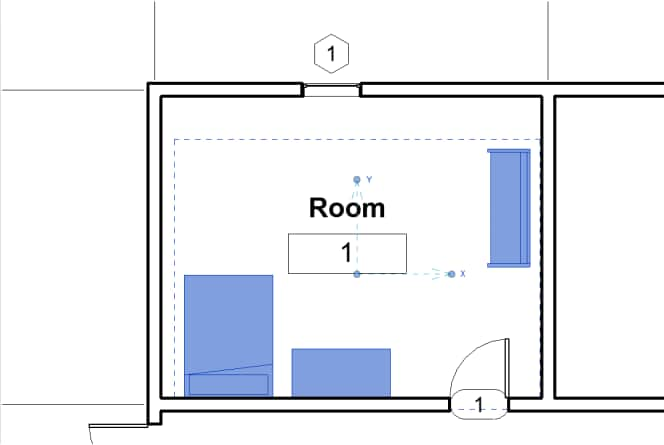
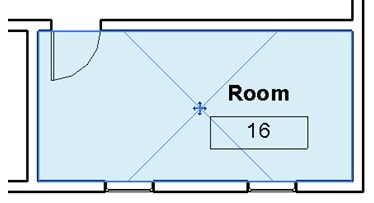
The location of a particular room is at the intersection of the lines of the cross displayed by Revit when the room is selected.
You accessed this point via the Room's Location property. As a Room is located at a particular point, the value returned from the Location property is actually a LocationPoint object. But the Location property – as it is shared with other Elements – returns a more generic Location object. To get access to the point information stored in the property, you therefore needed to cast its value to be a LocationPoint. You stored the result of type conversion – i.e. the room's location – in a variable of type LocationPoint.
LocationPoint locPt = (LocationPoint)room.Location;This cast does not use the as keyword, as you saw before. The as keyword checks the type of an object before casting it to the target type. The above code does not perform this check and is appropriate for cases where you know the underlying type of the object. As you know that instances of the Room class always return a LocationPoint from their Location property, it's quite safe to use it here. If the property somehow could not be treated as a LocationPoint (hypothetically speaking), this operation would cause an InvalidCastException to be thrown.
To get the modified point to return, you took the X and Y coordinates from your Room's center point and the Z coordinate from its LocationPoint and used these three values to create a new XYZ point.
XYZ roomCenter = new XYZ(boundCenter.X, boundCenter.Y, locPt.Point.Z);Finally, you returned the adjusted point from the GetRoomCenter() method.
That's it for your new methods. Let's now take a look at the code you inserted into your command's Execute() method.
Now that you have your methods in place to do the actual calculations, it's a fairly simple matter of calling them, one after the other. You can see a progression in the data that is effectively passed from one to the other.
          /// Get the group's center point

                XYZ origin = GetElementCenter(group);

            // Get the room that the picked group is located in

                Room? room = GetRoomOfGroup(doc, origin);

                if (room == null)
                {
                    message = "Could not find a room for the indicated group";
                    return Result.Failed;
                }

            // Get the room's center point
                XYZ sourceCenter = GetRoomCenter(room);
You started by getting the center of your group using GetElementCenter(), placing it in the origin variable of type XYZ. This was passed into the GetRoomOfGroup() method – along with the active document – to help with the room collection process, which returned the containing Room object to be stored in the room variable. This was then passed to the GetRoomCenter() method to determine the center of this room, which was stored in the sourceCenter variable.
The variable declaration `Room? room` is utilized to accommodate the possibility of a nullable type. If a Room is returned from the `GetRoomOfGroup()` method, it will be stored in the `room` object. However, if no Room is returned, the `room` value will be set to null.
The sourceCenter variable of type XYZ – containing the center of the Room where the Group selected by the user resides – then needed to be displayed to the user in a dialog box.
Each coordinate – X, Y and Z – of the XYZ class is of type double. This is the type you use to represent a double-precision, floating-point number. It's not important to worry about what the terms in italics actually mean: suffice it to say that a variable of type double uses 64-bits of data to hold an extremely accurate decimal number (to an accuracy of 15-16 digits).
To show these values in a dialog box, they need to be converted to a string. sourceCenter.X returns the point's X coordinate as a double, which can then be converted to a string type using the ToString() method. The "+" operator concatenates (joins together) two strings. The "\r\n" string represents a line break (it's a combination of a carriage return (\r) followed by a linefeed (\n), two characters that hark back to the days of the typewriter). This allowed you to split your string across multiple lines in the dialog box.
string coords = "X = " + sourceCenter.X.ToString() + "\r\n" + "Y = " + sourceCenter.Y.ToString() + "\r\n" + "Z = " + sourceCenter.Z.ToString();
The TaskDialog class allows you to display a standardized dialog box inside the Revit user interface. It's possible to add code to customize the dialog's controls prior to its display, but in this example you just used the Show() method to display your message. The first parameter is the dialog's title and the second is the main message.
TaskDialog.Show("Source room Center", coords);This wraps up the coding part of Lesson 6, before you move on to the next lesson, we will discuss a couple topics more in depth: Filtering with FilteredElementCollector and the if Statement.
Additional Topics
Filtering with FilteredElementCollector
In this lesson, you requested the contents of the Revit model to be filtered using the OfCategory() method:
collector.OfCategory(BuiltInCategory.OST_Rooms);
Element access and filtering is extremely important to Revit programming.
The FilteredElementCollector class provides several methods to add filters. The OfClass() method adds a class filter, so that the collected elements are all instances of the specified class.
The OfCategoryId() method adds a filter such that the elements collected will all have the specified category identifiers. The combined filter can be added by the WherePasses() method. The use of some or all of these methods allows you to extract or filter out elements for a wide range of scenarios. This helps avoid iterating through very large sets of elements – often a very time-consuming and resource-intensive process. You can find more information about filtering in "Filtering" section of the Revit Developer’s Guide (Revit product help >> Revit Developer’s Guide >> Basic Interaction with Revit Elements >> Filtering).
The if Statement
The ability to execute or evaluate different blocks of code in different scenarios is a core part of all programming languages. In C# this is most commonly achieved using the if statement.
The if statement allows you to execute statements (or sets of statements) conditionally based on the value of an expression which evaluates to a Boolean (i.e. true or false).
In the following example, a Boolean variable, named flagCheck, is set to true and then checked in the following if statement. The output is: The flag is set to true.
      bool flagCheck = true;
      if (flagCheck)
         {
           Console.WriteLine("The flag is set to true.");
         }
      else
         {
          Console.WriteLine("The flag is set to false.");
         }
The expression in the parentheses is evaluated to be true. Then the Console.WriteLine("The Boolean flag is set to true."); statement is executed. After executing the if statement, control is transferred to the next statement. The else clause is not executed in this example.
If you wish to execute more than one statement, multiple statements can be conditionally executed by including them in blocks using {}.
Was this information helpful?
The Assistant can help you find answers or contact an agent.
What level of support do you have?
Different subscription plans provide distinct categories of support. Find out the level of support for your plan.