Need help? Ask the Autodesk Assistant!
The Assistant can help you find answers or contact an agent.
What level of support do you have?
Different subscription plans provide distinct categories of support. Find out the level of support for your plan.
Autodesk Support
May 13, 2022
[This page has been updated to work with Revit 2025. If you are interested in previous versions, i.e., Revit 2023&2024, you can download the pdf version of the training materials from here.]
Lesson 2: Programming Overview
In the previous lesson, you saw how you can increase productivity in Autodesk Revit by implementing a plug-in built from a small amount of C# code.
You have heard the term .NET from Lesson 1 with reference to programming with Revit. .NET is a technology that enables communication between software, if you are interested in learning more, you will find information in the Additional Topics section.
You will now look more closely at what happened when you built and executed the code in the previous lesson.
What does it mean to “build” code?
The code you typed into Visual Studio in Lesson 1 was a set of human-readable instructions (source code) that needed to be converted into code that could be understood and executed by the computer. The “build” you performed did just that: it packaged up the resulting executable code into a DLL (Dynamic-Link Library) that can be loaded into Autodesk Revit.
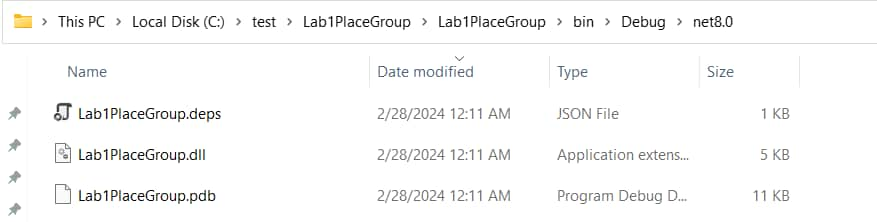
The following screenshot shows the output in DLL form along with the associated program debug database (which provides additional information when troubleshooting the DLL), once you have built the solution from Lesson 1 using Visual Studio. The path to which the DLL gets compiled is specified in the Visual Studio project settings and is set, by default, to the bin sub-folder of the Visual Studio project folder.
Choosing a Programming Language and Development Tool
Just as humans use different languages to communicate, you have various language options available to you when creating a Revit plug-in: for the purposes of this guide we have chosen C#, a strong general-purpose programming language that is popular with Revit developers.
There are a number of tools available for developing C# code. They range from open source tools to Microsoft’s flagship, professional development environment, Visual Studio Professional. In your case you will be using, a free version of Visual Studio Community focused on building C# applications.
Visual Studio is an Integrated Development Environment (IDE) because it is composed of various tools, menus and toolbars which ease the creation and management of your code.
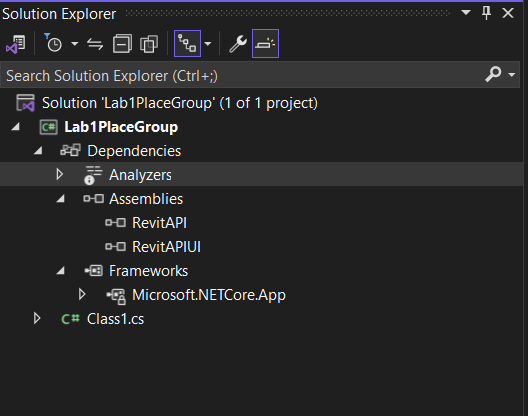
The project system in Visual Studio comprises of Solution and Project files as well as Project Items, the individual files belonging to projects. A solution is a container for one or more projects. Each project can in turn be considered a container for project items – such as source files, icons, etc. – most of which get compiled into the resultant executable file (EXE or DLL). Visual Studio provides a Solution Explorer that organizes and displays the contents of the loaded solution in a tree-view format:
The Visual Studio interface also contains a text editor and interface designer. These are displayed in the main window depending on the type of file being edited. The text editor is where you will enter the C# code for your Revit plug-in. This editor provides advanced features such as IntelliSense and collapsible code sections along with the more classic text-editing features such as bookmarks and the display of line numbers.
IntelliSense is an extremely valuable feature of the Visual Studio family that greatly improves programmer productivity: it automatically provides suggestions for the code being written based on the objects available and the letters that are being typed.
Clearly one of the key features of Visual Studio is its ability to build C# code into an executable file. During the build process, the language compiler performs various checks and analyses on the code. One such check is to ensure the code conforms to the syntactical rules of the C# language. The compiler also performs various other checks, such as whether a variable has been appropriately defined or not. Detected errors are reported via the Error List window, typically found at the bottom of the main window.

Reviewing your use of Visual Studio
In this section, you will review the steps performed using Visual Studio from the previous lesson. However, we will put them in the context of what you have just learned about programming in general and building your code.
1. In the first step, you simply launched Visual Studio.
2. You then created a new C# project of type Class Library.
While creating a project, using Visual Studio, you chose C# as a language., and library. You are presented with a list of available installed templates. You saw various types of applications that can be created. You selected the template according to the type of application you wish to create.
For plug-ins to load into Revit, they need to be Class Library assemblies (DLLs). It’s for this reason, in the second step, that you selected the Class Library template. The name you entered is used to identify the project within the solution.
3. Your blank project was created, containing a few standard project references to core .NET components along with a blank C# class file. It’s this file that gets displayed in the text editor window.
4. Saving the solution created physical files representing the contents of your class library project on the computer’s hard drive, allowing you to open and edit it at another time in the future.
5. This blank project, as created by Visual Studio, did not automatically make use of the Revit API. For it to do so, you added project references to the interface DLLs in Revit describing its RevitAPI.dll and RevitAPIUI.dll.
6. When using the Revit API, it is usual to add project references to the two separate interface DLLs making up the API: one deals with core product functionality, the other with the product’s user interface. You must link your project to these files to be able to work with Revit API.
Having added your project references, it’s important that you set one of their properties appropriately.
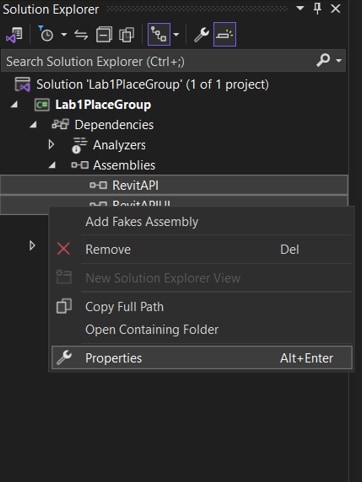

By default, Visual Studio adds project references with its Copy Local property set to Yes. This means that the referenced DLLs will get copied to the project’s output folder when it is built. In your case you wanted to change this setting to No, to make sure the DLLs did not get copied along with your assembly DLL.
To change this setting for the DLL, you selected the Revit API DLL (located under the Assemblies folder in the Solution Explorer on the right side of the Visual Studio interface) which populated the DLL reference’s properties in the Properties panel below. In this properties panel, you saw a property called Copy Local. You clicked on it to change the value from Yes to No using the drop-down list. Then you repeated these steps for the other DLL as well.
The reason for doing this is twofold: firstly, it’s unnecessary to copy these files – they consume disk space and take time to copy – but, more importantly, the Common Language Runtime CLR can get confused about which copy of each DLL needs to be loaded if they exist in multiple places. Making sure the DLLs do not get copied with the project output means the CLR will correctly find the ones in the Revit folder.
7. Next you added C# code using the Revit API into your project. In other words providing Revit with instructions on how to perform the functionality of copying a user-selected group from one place to another.
While developing code, it’s a good idea to build the solution from time to time, to check whether errors have been introduced in the code. The code does not necessarily have to be complete or functional when building the solution. This approach can help avoid potentially lengthy troubleshooting once the code is complete, and has the side benefit of automatically saving any edited source files before the build starts.
To build a solution inside Visual Studio, select Build Solution from the Build pull-down menu.
If the build process was successful, you would see a Build Succeeded status in the bottom left corner of the Visual Studio interface.
A quick recap: in this lesson you took a brief look at what happens when you build a project, as well as some background information on C# and Visual Studio Community. You reviewed the steps you had taken in the previous lesson to build your basic Revit plug-in, putting it in the context of your learning about programming.
Additional Topics
.NET is an application platform supported by Microsoft. The first version of .NET, .NET Framework 1.0, was first released on January 15, 2002. Since then, it has gone through a number of evolutions along with branding changes. .NET Core 1.0 was released in June 27, 2016. With .NET 5 release in November 2020, the “Core” branding was dropped. As of June 2024, .NET 8, released version.*1
Revit 2025 API uses .NET 8. The previous versions, Revit 2021/2022/2023/2024 use .NET 4.8.
In the following, we will explain the based on the latest version of .NET.
.NET is an open-source, cross-platform framework developed by Microsoft. It is used for building modern, cloud-based, and high-performance applications. .NET supports multiple operating systems, including Windows, macOS, and Linux, making it highly versatile. It provides a rich set of libraries and tools for developing applications for web, mobile, desktop, gaming, IoT (Internet of Things), and more. Additionally, .NET offers high performance, scalability, and flexibility, making it a popular choice for developers across various domains.
.NET contains a variety of components that collectively form a versatile and powerful framework for building modern applications. Some key components of .NET include:
Base Class Library (BCL): .NET includes a rich set of classes, types, and APIs that provide foundational functionality for common programming tasks such as file I/O, networking, data access, and more.
Runtime: The .NET runtime provides the execution environment for .NET applications. It includes the Common Language Runtime (CLR), which manages memory, handles exceptions, and executes compiled code, as well as the Just-In-Time (JIT) compiler, which translates Intermediate Language (IL) code into native machine code at runtime.
Compiler: .NET includes compilers for various programming languages supported by the framework, such as C#, F#, and Visual Basic. These compilers translate source code written in these languages into IL code that runs on the .NET runtime.
SDK (Software Development Kit): The .NET SDK contains command-line tools and utilities for developing, building, testing, and publishing .NET applications. It includes tools like the dotnet CLI (Command-Line Interface) for project management, compilation, and package management.
Entity Framework Core: Entity Framework Core is a lightweight, extensible Object-Relational Mapping (ORM) framework for .NET. It enables developers to work with relational databases using strongly typed .NET objects, simplifying data access and manipulation tasks.
NuGet: NuGet is the package manager for .NET and allows developers to easily discover, install, and manage dependencies for their projects. It hosts a vast ecosystem of libraries and packages that extend the functionality of .NET and enable rapid application development.
These components, along with others, collectively form the .NET framework, providing developers with a comprehensive set of tools, libraries, and runtime support for building a wide range of applications across different platforms and domains.
Building Executables
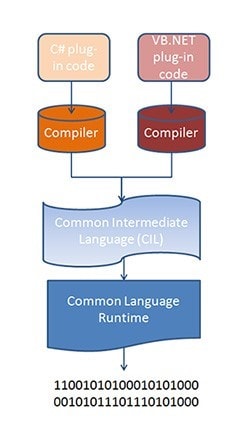
When you compile your code into a DLL in .NET, it undergoes compilation into Common Intermediate Language (CIL), also known as MSIL (Microsoft Intermediate Language). CIL is a CPU-independent set of instructions that can be executed by the Common Language Runtime (CLR) on Windows operating systems. It's worth noting that CIL is typically portable across 32- and 64-bit systems and can also be compatible with non-Windows operating systems to some extent.
The CIL code generated from your C# source code is then encapsulated into a .NET assembly. This assembly serves as a container for the CIL code, stored in Portable Executable (PE) format, which includes both the CIL instructions and associated metadata. Assemblies can take the form of either process assemblies (EXEs) or library assemblies (DLLs), depending on their intended usage and functionality.
During the course of this guide, Revit plug-ins are compiled into library assembly files (DLLs) which are then loaded and executed from within Revit’s memory space.
Running Executables
https://en.wikipedia.org/wiki/.NET
Was this information helpful?
The Assistant can help you find answers or contact an agent.
What level of support do you have?
Different subscription plans provide distinct categories of support. Find out the level of support for your plan.