Need help? Ask the Autodesk Assistant!
The Assistant can help you find answers or contact an agent.
What level of support do you have?
Different subscription plans provide distinct categories of support. Find out the level of support for your plan.
Autodesk Support
Mar 31, 2023
Products and versions covered
|
In this lesson you will learn about looping (continually executing a section of code until a logical condition is met); and how you can used Extended Entity Data (EED) to save information in your DWG file so you can use it again when the DWG is reopened. You will edit your code to filter your overrule by Xdata instead of by ObjectIds; finally you will implement a second custom command to later remove Xdata from a BlockReference’s AttributeReferences to stop it from being overruled. |
Provide Feedback: Please provide feedback about this AutoCAD Training or this lesson via email: myfirstplugin@autodesk.com Lesson Downloads
|

Extended Entity Data
If you closed Visual Studio Community after the last lesson, re-launch it now and open your KeepAttributesHorizontal project.
Now you’re going to add code to your project to add Xdata to the AttributeReferences you want to overrule. Xdata is a way to add custom data for your application to individual DBObjects in a drawing. Once you’ve added the Xdata, it is automatically saved when the drawing is saved to a DWG file, and is available to your application again when the DWG file is reopened. Xdata is one type of ‘Extended Entity Data’. The other type is called an Xrecord. You won’t be using Xrecords in this tutorial.
Add the following variable declaration to your Command class.
Public Class Commands
    ' Class variable to store the instance of our overrule
    Private Shared myOverrule As KeepStraightOverrule
    ' Registered Aplication Id for Xdata
    Const mXdataName As String = "ADSK_ATTRIBUTE_ZERO_OVERRULE"
A Const variable stores a value that cannot be changed. It’s a useful way to store constant (unchanging) data that you will use again and again in your application. Here you are storing the name you’re going to use as your Xdata Registered Application Id. By using a constant string variable, you can use the variable name throughout your code, and just change the declaration if you want to change what the text in the string says. That way you only must edit your code in one place.
There may be more than one plug-in adding Xdata to the same entity. You use a registered application Id to identify which data is yours. In fact, AutoCAD requires that all Xdata you add has a registered application Id as its first element. To use the registered application Id, you have to register it first, so add the following line of code to the ImplementOverrule() method:
Dim objIds() As ObjectId
Dim db As Database = doc.Database

AddRegAppId(db)

Using trans As Transaction =

    db.TransactionManager.StartTransaction
The Visual Studio IntelliSense system underlines AddRegAppId() in blue to tell you that it doesn’t recognize this method. If you hover your mouse over it, Visual Studio tells you its best guess at the problem and tries to offer you a solution.
To fix the problem, add the following new method inside the Command class:
End Sub

Private Shared Sub AddRegAppId(ByVal db As Database)
    Using trans As Transaction =
        db.TransactionManager.StartTransaction()

            ' First create our RegAppId (if it doesn't already exist)
            Dim appTbl As RegAppTable =
                trans.GetObject(db.RegAppTableId, OpenMode.ForRead)

            If Not appTbl.Has(mXdataName) Then
                Dim appTblRec As New RegAppTableRecord
                appTbl.UpgradeOpen()
                appTblRec.Name = mXdataName
                appTbl.Add(appTblRec)
                trans.AddNewlyCreatedDBObject(appTblRec, True)
            End If
            trans.Commit()

        End Using

    End Sub

End Class
This method is registering our ‘registered application Id’. It does this by adding a new RegAppTableRecord to the Database’s RegAppTable.
As you learn more of the AutoCAD .NET API, you’ll find that many objects are stored as records in tables. For example:
All of these are generically known as SymbolTableRecords and SymbolTables. (Actually, they are all derived from those two classes).
Your code:
This is the first time you’ve added a new DBObject to the Database. You added the new RegAppTableRecord to the RegAppTable using the RegAppTable.Add() method. Whenever you add a DBObject to the Database inside a Transaction, you also have to add it to the Transaction using the Transaction.AddNewlyCreatedObject() method.
Notice as well that this method is Private – meaning it can only be called by another method inside your Command class.
Refactoring code
Next you’re going to refactor the project to move the code that creates and registers your overrule into a separate function. You’re doing this now because you’re going to add two new commands later – both of which will need to use this same code. Move that code from ImplementOverrule() to a new class method, like this:
End Using

    ' Create and register our overrule and turn overruling on.
    ActivateOverrule()

End Sub

<CommandMethod("ActivateOverrule")>
Public Shared Sub ActivateOverrule()
    ' We only want to create our overrule instance once,
    ' so we check if it already exists before we create it
    ' (i.e. this may be the 2nd time we've run the command)
    If myOverrule Is Nothing Then
        ' Instantiate our overrule class>
        myOverrule = New KeepStraightOverrule>
        ' Register the overrule
        Overrule.AddOverrule(
            RXClass.GetClass(GetType(AttributeReference)),
                myOverrule, False)
    End If

    ' Specify which Attributes will be overruled
    myOverrule.SetXDataFilter(mXdataName)
    ' Make sure overruling is turned on so our overrule works
    Overrule.Overruling = True

End Sub
As well as creating the new ActivateOverrule() method, you’ve added a call to it from ImplementOverrule(), so the same code is run when the user invokes the KEEPSTRAIGHT command. You’ve also added a CommandMethod attribute to the ActivateOverrule() method to define another custom command to allow the user to create and register the overrule and turn overruling on without having to select a BlockReference to overrule. This will be important when we start saving our Xdata in the drawing – so the user can turn on your overrule for a drawing they’ve just opened.
Now you’ve got your basic plumbing in place, you’re ready to add Xdata to the BlockReference the user selects during the KEEPSTRAIGHT command. This requires more changes to the ImplementOverrule() method:
Dim db As Database = doc.Database
AddRegAppId(db)
Using trans As Transaction =
    db.TransactionManager.StartTransaction
    ' Open the BlockReference for read.
    ' We know its a BlockReference because we set a filter in
    ' our PromptEntityOptions
    Dim blkRef As BlockReference =
        trans.GetObject(res.ObjectId, OpenMode.ForRead)
    ' Record the ObjectIds of all AttributeReferences
    ' attached to the BlockReference.
    Dim attRefColl As AttributeCollection =
                blkRef.AttributeCollection
    ' Iterate through  ObjectIds of all AttributeReferences
    ' attached to the BlockReference, opening each
    ' AttributeReference and adding xdata to it.
    For Each objId As ObjectId In attRefColl
        Dim attRef As AttributeReference =
                trans.GetObject(objId, OpenMode.ForWrite)
        ' Create new xdata containing the overrule filter name
        Using resBuf As New ResultBuffer(
            New TypedValue
                DxfCode.ExtendedDataRegAppName, mXdataName),
            New TypedValue(
                DxfCode.ExtendedDataAsciiString, "Dummy text"))
                    ' Add the xdata
                attRef.XData = resBuf
            End Using
        Next
        trans.Commit()

    End Using

' Create and register our overrule and turn overruling on.
ActivateOverrule()
Looping
You just changed your plug-in to use an Xdata filter to decide which AttributeReferences to apply its overrule to. You did that by passing your Xdata registered application Id (stored in the constant variable mXdataName) to the overrule’s SetXDataFilter() method in your new ActivateOverrule() method. This replaces the SetIdFilter() method you previously used.
You also changed your code to add your Xdata to each AttributeReference in the AttributeCollection of the BlockReference the user selected. To iterate through each AttributeReference in the AttributeCollection, you used a loop – in this case you’re using a For Each…Next loop. It’s easiest to see how this works by stepping through your code in the debugger. Remove any breakpoints you already had in the project and add a new breakpoint to the line that starts with For Each….
Time to test your code again:
Your debugger should stop at your breakpoint:

Next, open the Watch window if it’s not already open (Debug menu -> Windows -> Watch), click just below Name in the Watch window to activate the edit box there, type attDef.TextString, and press <Enter>:
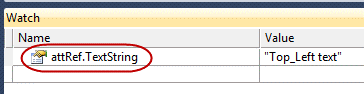
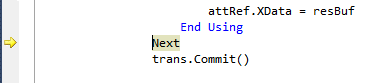
Step Over the code until the point of execution reaches the line beginning with Using resBuf. The Value of attRef.TextString should now read Top_Left text, as in the image above.
Keep stepping over the code until the line of execution reaches the Next keyword:
Before you step over this line, try to guess what will happen when you do so.
Did you guess right?
The BlockReference you selected has four attributes. That means its AttributeCollection holds the ObjectIds for four AttributeReferences. The For Each statement is telling the .NET runtime to execute the code that follows (up until the Next keyword). The Next keyword tells the runtime to move execution back to the start of the loop (back to the For Each line) until the code has run for each AttributeReference in the AttributeCollection.
The For Each line also has a variable declaration in it. The variable of type ObjectId called objId is assigned the value of each AttributeReference’s ObjectId in turn, and can then be used inside the loop.
The code inside the For Each…Next loop is opening each AttributeReference in the Transaction (using its ObjectId), and then assigning Xdata to it. The Transaction.GetObject() method opens the AttributeReferenceForWrite because you’re going to edit it – you’re going to add Xdata to it.
The Xdata itself consists of a ResultBuffer chain. This is just the data format used in Xdata (and Xrecords). If you’ve used LISP before or if you’ve worked with DXF, you’ll know this format already. If not, we briefly explain the ResultBuffer data format below.
Step over the code in your debugger until the line of execution is again at the line starting with Using resBuf. Look at the value of the attRef.TextString property in the Watch window – it’s changed to the value for the second AttributeReference. Keep stepping through all four iterations of the loop, watching how attRef.TextString changes.
Loops are a powerful way to keep executing the same code until some logical condition is met. Without the For Each…Next loop, the code above would have to be written something like this:
Dim attRef As AttributeReference =
    trans.GetObject(attRefColl.Item(0), OpenMode.ForWrite)
...

Dim attRef As AttributeReference =
    trans.GetObject(attRefColl.Item(1), OpenMode.ForWrite)
...

Dim attRef As AttributeReference =
    trans.GetObject(attRefColl.Item(2), OpenMode.ForWrite)
...

etc.
Except you don’t know how many items are in attRefColl until you run your plug-in and the user selects a block.
There are several types of loop available in Visual Basic .NET. They are explained in more detail below.
Time to continue testing your code:
Unfiltering
Stop debugging now. It’s time to implement one more custom command. You have commands to add Xdata to your attributes, and you have a command to turn on your overrule without having to select a new block in the drawing. Your final command will remove the Xdata from the attributes of a block you select, so they will no longer be overruled.
Add this CommandMethod implementation to your Commands class:
<CommandMethod("DontKeepStraight")>
Public Shared Sub RemoveXdata()
    Dim doc As Document =
        Application.DocumentManager.MdiActiveDocument
    Dim ed As Editor = doc.Editor

    ' Select a block reference

    Dim opts As New PromptEntityOptions(
        vbLf & "Select a block reference:")
    opts.SetRejectMessage(vbLf & "Must be block reference...")
    opts.AddAllowedClass(GetType(BlockReference), True)

    Dim res As PromptEntityResult = ed.GetEntity(opts)

    If res.Status <> PromptStatus.OK Then
        Exit Sub
    End If

    Dim db As Database = doc.Database

    AddRegAppId(db)

    Using trans As Transaction =
        db.TransactionManager.StartTransaction
        ' Open the BlockReference for read.
        ' We know its a BlockReference because we set a filter in
        ' our PromptEntityOptions
        Dim blkRef As BlockReference =
            trans.GetObject(res.ObjectId, OpenMode.ForRead)
        ' Record the ObjectIds of all AttributeReferences
        ' attached to the BlockReference.
        Dim attRefColl As AttributeCollection =
            blkRef.AttributeCollection
        ' Iterate through  ObjectIds of all AttributeReferences
        ' attached to the BlockReference, opening each
        ' AttributeReference and adding xdata to it.
        For Each objId As ObjectId In attRefColl
            Dim attRef As AttributeReference =
                trans.GetObject(objId, OpenMode.ForWrite)
            ' Create new xdata containing the overrule filter name
            Using resBuf As New ResultBuffer(
                New TypedValue(
                    DxfCode.ExtendedDataRegAppName, mXdataName))
                        ' Add the xdata.
                        ' Because we leave this blank except for the regappid,
                        ' it erases any Xdata we previously added.
                        attRef.XData = resBuf
                End Using
            Next
            trans.Commit()
        End Using
End Sub
To test this code:
Read through the code and comments to understand what this new function is doing. If necessary, add a breakpoint and step over the code in your debugger.
The RemoveXdata() method reuses a lot of the code that was already in the ImplementOverrule() method. We’ve left it as an exercise for you to refactor those two methods to put the common code into a separate helper method, as you did for the ActivateOverrule() method.
Congratulations! You’ve now created your first plug-in and finished this tutorial. In the next and final lesson you will find out how to continue to learn to program using the AutoCAD .NET API.
Additional Topics
Conditional Statements
You’ve learned a little about conditional statements already – you’ve used the If…Then construct several times in your code already. However, there are some subtleties you’ve not yet discovered. For completeness, we also review the other conditional statement you’re likely to use – the Select…Case statement. Click on the sub-headings below for a direct link to the MSDN documentation.
Here is a more comprehensive example of an If…Then statement. (Put the code into a test project and step through it with your debugger it if you like).
Dim num As Integer = 1
If num = 1 Then
    ' Do something
ElseIf num = 2 Then
    ' Do something else
Else
    ' Don't do anything
End If You can have as many ElseIf statements as you like, but if you have a lot of them, then your code may be neater if you use the Select….Case conditional statement instead.
You use Select…Case when you want to execute a different code segment depending on the value of a variable you’re querying. Here is how you would have written the about If…Then statement using Select…Case:
Dim num As Integer = 1
Select Case num
    Case 1
        ' Do something
    Case 2
        ' Do something else
    Case Else
        ' Don't do anything
End Select
The logic works the same as for the If…Then example – If num = 1, then the code below Case 1 is executed, etc., etc. You can also group cases together, for example:
Case 3 To 6
Case 7, 11, 13
Loops
Visual Basic .NET offers several ways to create loops. There are subtleties to each method that give you a lot of control over how the loop executes. We recommend you review the full syntax for each type on msdn.microsoft.com. Click on the sub-headings below for a direct link to the MSDN documentation.
The For Each…Next loop you used in this lesson is a special case of the For…Next loop and is used when you need to iterate through every element in a collection, or array. The For…Next loop takes a loop variable (index in the example below) and increments it for each iteration of the loop until it no longer falls between the upper and lower bounds defined for the loop (= 0 to 10 means start with index = 0 and end when index > 10). The optional Step keyword specifies the value to add to the loop variable for each iteration. For example, this loop executes the contained code for values of index = 0, 2, 4, 6, 8, and 10:
For index As Integer = 0 To 10 Step 2
...
Next
If the Step 2 is removed then the code inside the loop would be executed for index = 0, 1, 2, 3, 4, 5, 6, 7, 8, 9, and 10. The Step can be negative (i.e. you can iterate backwards from a high number to a low number.
You can also move to the next loop iteration using the Continue For keyword or exit the loop using Exit For. This loop skips the loop iteration for index = 5, and exits the loop when index = 8
Dim skipThis As Integer = 5
Dim exitThis As Integer = 8
For index As Integer = 0 To 10
...

    If index = skipThis Then Continue For

    If index = exitThis Then Exit For

...

NextThis is the type of loop you used in your plug-in code. A For Each…Next loop is like For…Next, but is used to loop through the objects in an array and other ‘collection’ like classes. The syntax is the same as For…Next, except there is no Step option.
To recap, here is how you could use For Each…Next with the attRefColl AttributeCollection variable in the plug-in code:
For Each id As ObjectId In attRefColl
    ' Do something with the ObjectId
Next The Do…Loop uses the While or Until keywords to keep looping over the same section of as long as (while) or until a logical condition is satisfied. This code loops until the variable count has the value 10 (i.e. until count = 10 is True)
Dim count As Integer = 0
Do
    count = count + 1
Loop Until count = 10
This code does the same thing using While instead of Until:
Do
    count = count + 1
Loop While count <= 10
In the preceding two examples, the code in the Do…Loop will execute at least once, because the logical test is at the end of the loop. You can also put While/Until at the start of the loop so the code inside the loop will never be executed if the logical condition isn’t True when the Do statement is executed. The code below will loop until set a condition that indicates that {I want to stop looping}:
Dim flag As Boolean = True
Do While flag
    If {I want to stop looping} Then flag = False
Loop
Extended Entity Data
Xdata
Xdata can be attached to any DBObject. A total of 16KB of Xdata can be added to each object. You should always assume that you’re not the only person adding Xdata to an object, so that the polite limit for your own Xdata is about 2KB to leave room for others. If you need to store more than that, then you should use Xrecords instead.
Xdata is stored as chain of ResultBuffers. The first ResultBuffer in the chain stores your registered application Id so you know the data that follows it (until the next registered application Id) is yours. If you’re filtering your overrule by Xdata, then you’re filtering on the registered application Id.
Xrecords
Each Xrecord can hold up to 2GB of data. You create the Xrecords you need, so (unlike Xdata) you have all the storage space in an Xrecord for yourself.
Xrecords are stored in Dictionary objects. You will find Dictionary objects in two places.
You can create additional Dictionaries and store them inside the Named Objects Dictionary or in an Extension Dictionary. Any entry in a Dictionary is referenced by name. The other type of extended entity data filtering available for overrules is to filter on the name of an object stored in the DBObject’s extension dictionary – that would be the name you stored your Xrecord under if you added your Xrecord directly to the extension dictionary, or the name of the sub-dictionary you added if you prefer to use a sub dictionary.
You won’t use Xrecords in this tutorial, but they are used in the AutoCAD .NET training labs.
Xrecord data is stored as a chain of ResultBuffers – just like for Xdata.
ResultBuffers
Data used in Xdata and Xrecords is stored as a ResultBuffer, which is a list of TypedValue objects. Each TypedValue in the list stores a single data item.
A TypedValue consists of a TypeCode and a Value. The TypeCode describes what format the data is in (an integer, a string, a double, etc.); and the Value (obviously) stores the actual value of the data (10, “Some Text”, 3.14159265, etc.).
If you’re familiar with DXF codes from LISP or DXF files, then you’ll immediately understand this, because the TypeCode is simply the DXF code, and the Value is the value for that DXF code. The .NET API provides the DxfCode enumeration (or Enum) to give you easy access to the DXF codes without having to remember what each DXF code number stands for.
An enumeration is simply a set of predefined names that you can use instead of a number. For example, you might decide that a method should accept an integer as a parameter that it uses to know whether it should draw an arc, a circle or an ellipse. But it’s hard to remember that ‘0’ means arc, ‘1’ means circle and ‘2’ means ellipse. Instead, you could define an Enum and have the method accept that as a parameter instead, like this:
Public Enum WhatToDraw
    DrawArc
    DrawCircle
    DrawEllipse
End Enum

Public Sub DrawIt(ByVal param As WhatToDraw)
    Select Case param
        Case WhatToDraw.DrawArc
            ' Draw an arc
        Case WhatToDraw.DrawCircle
            ' Draw a circle
        Case WhatToDraw.DrawEllipse
            ' Draw an ellipse
    End Select
End Sub
That’s so much easier to understand when reading through your code than if you’d used integers.
You’ve already used two DxfCode Enums in the code you wrote in this lesson:
There are too many DxfCode Enum values to list here. You’ll find them all if you look in DxfCode in the AutoCAD Managed Class Reference. Here are just a few of the more common ones:
You can add as many new TypedValue objects to your ResultBuffer using the ResultBuffer.Add() method.
The times you’ll mostly use ResultBuffers are in Xdata, Xrecords, selection set filters, and if you create custom LISP-callable functions. ResultBuffers and DxfCodes are particular to AutoCAD – you’re very unlikely to use them to store data in your plug-ins if you’re not going to pass that data on to AutoCAD.
Was this information helpful?
The Assistant can help you find answers or contact an agent.
What level of support do you have?
Different subscription plans provide distinct categories of support. Find out the level of support for your plan.