Need help? Ask the Autodesk Assistant!
The Assistant can help you find answers or contact an agent.
What level of support do you have?
Different subscription plans provide distinct categories of support. Find out the level of support for your plan.
Autodesk Support
Aug 16, 2018
In this lesson, you will look more closely at the code you wrote in Lesson 1. In this lesson we’ll be introducing lots of programming concepts that you won’t be familiar with if you’re new to programming (and particularly if you’re new to object oriented programming). The Additonal Topics section at the end of this lesson describes these concepts in detail. You may prefer to read that first, or follow the links to each concept as it is first introduced in the lesson.
If you had shut down the Visual Studio Community IDE, start it up again, and reopen your project (use File menu-> Recent Projects and Solutions so you don’t have to browse to the folder where you saved the project). We’ll start at the top of the code and work our way down.

Keywords
When you look at the code in Visual Studio (and in the examples in Lesson 3), one of the first things you’ll have noticed is the text coloring: for readability, Visual Studio Community changes the color of certain words in the code. Words highlighted in blue are known as keywords, which can only be used in certain situations. You would not be able to declare a variable named Imports, for instance: as it is reserved to mean something very specific in Visual Basic .NET. Quickly look through your code in Visual Studio Community now and notice which words are colored blue.
Namespace
Imports Autodesk.AutoCAD.Runtime
Imports Autodesk.AutoCAD.DatabaseServices
Imports Autodesk.AutoCAD.Geometry
The first few lines of code start with the Imports keyword. When working with different library assemblies in your Visual Basic .NET project, it’s quite common for classes to share the same name – there might be multiple versions of the Point class in different libraries, for instance. To avoid naming conflicts, .NET provides you with the concept of namespaces. A namespace is a way to organize classes by grouping them together in a logical way and to help you identity the class you wish to use.
As an example, let’s say there are two boys named John living in the same neighborhood. One possible way of uniquely identifying one of the Johns might be to use his last name. But if both Johns have the same last name, such as Smith, this is no longer enough to uniquely identify them. You now need to use an additional identifier, such as the school at which they study. If this was put into .NET syntax, you might use SchoolA.Smith.John for one and SchoolB.Smith.John for the other.
In this way, you’re able to identify the use of specific classes in Visual Basic .NET. The Imports keyword gives you direct access to the classes contained in the included namespace, which saves the effort of having to enter the full namespace when typing the names of classes. It also causes the namespace’s various classes to be added to the list presented by the IntelliSense feature.
For example, if you hadn’t imported the Autodesk.AutoCAD.Runtime namespace, then you would have had to write the line:
<CommandMethod("KeepStraight")>as
<Autodesk.AutoCAD.Runtime.CommandMethod("KeepStraight")>Importing namespaces saves you a lot of typing.
The Imports keyword is a directive telling the Visual Basic .NET compiler to provide access to the contents of a specified namespace from the code in this source file.
The line following the Imports directives is also related to namespaces.
Namespace HorizontalAttributes
This is defining a namespace for the classes you created in your plug-in assembly DLL. That isn’t important for this tutorial, but if someone else wanted to use your assembly in their project, then they would import the namespaces you defined in the same way you imported the various Autodesk.AutoCAD namespaces.
Notice that there’s a matching End Namespace the bottom of MyCommands.vb – just like you had for classes and subroutines.
Commands Class
    Public Class Commands
...
    End Class
Everything in .NET is based on classes. You created two classes in lesson one: the Commands class is the class that defines your custom AutoCAD command; we’ll come to the KeepStraightOverrule class soon.
Your Commands class has a single member variable – myOverrule – that is used to store an instance of our KeepStraightOverrule class.
Private Shared myOverrule As KeepStraightOverruleThis is just like the member variables you saw before, except for the Shared keyword. This keyword means that you don’t have to create an instance of your class to access the variable. Similarly, every instance of your class that you do create will see the same value for this variable. If the variable were not shared, then its value could be different in every class instance. Don’t worry about the details for now.
Think of a shared variable as being like a library. A library contains information that everyone can go to look up. A shared variable contains information that every instance of that class can look up.
CommandMethod Attribute
<CommandMethod("KeepStraight")>
The triangular brackets around CommandMethod mean it’s an Attribute. Attributes define certain properties (or attributes) for an assembly or method. The CommandMethod attribute tells AutoCAD that it should run the method that follows it whenever the user types the command KEEPSTRAIGHT at the AutoCAD command-line. If you changed “KeepStraight” to “Flurble”, then AutoCAD will run this code in response to the user typing” FLURBLE” instead.
Public Shared Sub ImplementOverrule()
              If myOverrule  Is Nothing Then
                myOverrule = New KeepStraightOverrule
                Overrule.AddOverrule(
                  RXClass.GetClass(GetType(AttributeReference)),
                  myOverrule, False)
            End If
            Overrule.Overruling = True
        End Sub
The ImplementOverrule subroutine creates a new instance of your KeepStraightOverrule class and stores it in your class member variable. Because we added the CommandMethod attribute to this subroutine, AutoCAD will call this code when the user invokes your custom command, and control will be passed back to AutoCAD at the end of the subroutine.
Notice that you used the Shared keyword for this subroutine as well as for the member variable. The reason for this is the way AutoCAD handles classes that define custom commands. If a subroutine with a CommandMethod attribute is not shared, then AutoCAD will create a new instance of the class for every document in which the custom command is run. We don’t want that, so we make our command method (and any other methods, properties or member variables it needs) shared. This means that AutoCAD doesn’t create multiple instances of our class. (It doesn’t have to instantiate the class at all to use shared methods).
The If … Then … End If keywords form a conditional statement. A conditional statement allows you to determine which part of your code to execute depending on certain logical conditions. We’ll look at conditional statements again later in this tutorial.
A logical condition is a test that can either be true or false. For example, “1 + 1 = 2” is true, but “1 + 1 = 3” is false; for another example, “A fish can swim” is true, but “a brick floats” is false.
In your code, you are testing whether you’ve created an instance of your KeepStraightOverrule class and assigned it to your myOverrule member variable. If this is the first time you’ve run this command since loading your plug-in into AutoCAD, then you haven’t done that yet, so “myOverrule Is Nothing” is true, and the code in the If statement is executed. If you’ve run this command before, then myOverrule is already storing your class instance, so “myOverrule Is Nothing” is false and the code in the If statement isn’t executed.
The AutoCAD API includes an extremely powerful set of classes called Overrules. Using Overrules is how we change the behavior of a standard AutoCAD entity; such as a line, a circle, or a block attribute. The code in the If statement is creating a new instance of your KeepStraightOverrule class, storing it in myOverrule, and telling the overruling system that it should apply myOverrule to the AutoCAD AttributeReference class (that’s the class that represents an attribute of a block insert).
The last line of code in the subroutine is outside the If statement, so it is executed every time the user runs our command. It simply makes sure that the AutoCAD overruling system is switched on.
KeepStraightOverrule Class
The next part of the code is defining another class, but this time we’re using inheritance.
    Public Class KeepStraightOverrule
        Inherits TransformOverrule
...
    End Class
Moving or rotating an entity is generically called transforming it, and so we use one of the Overrule classes from the AutoCAD API – a TransformOverrule to overrule how our attribute behaves when it is transformed. The AutoCAD API provides us with a set of Overrule classes that we can use, but there’s no way the API designers could know how we’d want to change (overrule) the standard entity behavior. Therefore, they provide us with a set of Overrule classes that don’t do anything. We add our custom behavior by deriving (Inheritance) from one of these classes and overriding the methods we need.
When AutoCAD wants to transform an entity, it calls the TransformBy method on the instance of the Entity class it wants to transform, so you are overriding (or replace) that function in your TransformOverrule and adding your own behavior. The Overrides keyword tells the compiler you’re replacing a function defined in the parent TransformOverrule class with your own implementation.
        Public Overrides Sub TransformBy(ByVal entity As Entity,
                                         ByVal transform As Matrix3d)
            MyBase.TransformBy(entity, transform)
            Dim attRef As AttributeReference = entity
            attRef.Rotation = 0.0
        End Sub
You want to stop the attribute (AttributeReference class) having a rotation that is anything other than parallel to the WCS x-axis, so you first tell the AttributeReference to run its normal TransformBy method (MyBase.TransformBy), and then you set the Rotation property of the AttributeReference to 0 (attRef.Rotation = 0.0).
This code also introduces the concept of casting:
How do we access the AttributeReference.Rotation property when our variable is of type Entity?
The answer is by casting. You can assign a class instance to a variable representing any class that precedes it in its inheritance hierarchy. You are only overruling the AttributeReference class, so you know that the entity variable must really be storing an AttributeReference object. But as long as you’re using the entity parameter in your code, you can only access methods and properties for of the Entity class. To access a property in a derived class (AttributeReference), you must cast the variable to a variable of that type. In Visual Basic .NET, you can do this simply by assigning the variable to another variable of the correct type. That is what you are doing in the line:
Dim attRef As AttributeReference = entityThe inheritance hierarchy for AttributeReference is DBObject -> DBEntity -> DBText -> AttributeReference, so you can similarly cast the entity variable to DBObject or DBText.
You have to be very careful when casting to be sure you’re casting to variables of the right type. If you get it wrong, then your code will generate an error. For example, you can’t cast AttributeReference to Line, because AttributeReference and Line aren’t on the same branch of the inheritance tree.
Ouch! That was a lot of information. Wouldn’t it be easier to understand if you could step through the code as it was running and see the order in which each line was executed? Fortunately, you can – that’s called debugging. You’ll learn to debug in Lesson 5.
In the previous lesson, you learned that a program is a sequence of instructions that tells the computer how to perform one or more tasks. Simple programs tend to consist of a sequence or list of instructions operating on variables – data representing what’s happening in the program as it executes. But, with increasing complexity, such linear sequences of instructions (an approach also often referred to as procedural programming) can be difficult to manage and ends up not being well-suited for the task for which the code was written.
To help address the complexity problem, Object-Oriented Programming (OOP) was developed to allow source code to be structured differently, enabling componentization and reuse. OOP encourages you to develop discrete, reusable units of programming logic that are aimed at modeling objects from the problem domain and the relationships between them.
A good example of this is a map. A map of a city can be considered as a model or a simplified representation of the city itself, providing a useful abstraction of the information you need to get around it.
The key to good object-oriented design is to model the elements of the problem domain as individual objects displaying the relevant behavior of the things they represent and the relationships between them.Classes
A class can be thought of as a type which can be used to describe a representation of a thing. A class can be considered the template that describes the details of an object and is used to create individual objects. In this way, classes can help define the common characteristics of objects of their type: the objects’ attributes (properties) and behaviors (functions or subs).
An object is an instance of a class. These are the building blocks of Object-Oriented Programming and can be thought of as variables – often quite complex ones – which encapsulate both data and behavior.
To provide an example, the relationship between a class and an object has parallels with AutoCAD iFeatures. An iFeature could be considered as a class. When you create an instance of this iFeature, that instance can be thought of as an object. The iFeature is the blueprint or template: each instance of the iFeature has the set of parameters defined in the iFeature but has different parameter values. They might have a different length or width, for instance.
Classes
At the core of object-oriented programming is the class. A class can be thought of as a type that can be used to describe a representation of a thing or an individual object. A class can be considered the template that describes how to create individual objects. In this way classes can help define the common characteristics of objects of their type: the objects’ attributes (properties) and behaviors (methods).
The AutoCAD .NET API is object-oriented, and so it represents parts of AutoCAD, the DWG file and geometry in the DWG as a set of classes. Here are some classes you’ll find in the AutoCAD .NET API:
An object is an instance of a class. These are the building blocks of Object-Oriented Programming and can be thought of as variables – often quite complex ones – that encapsulate both data and behavior.
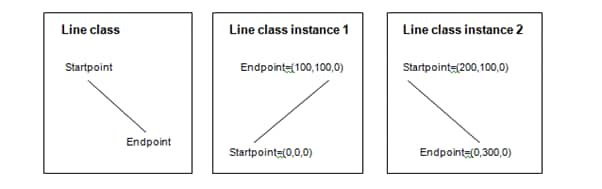
For example, your drawing may contain lots of LINEs. Every LINE in your drawing will have a different startpoint and endpoint (and color, layer, linetype, lineweight, etc.), and so every LINE in the drawing is represented by its own instance of the Line class in the API. Each LINE is a Line object:
You will use classes in two ways when you use the AutoCAD .NET API. You will use the predefined classes provided by the AutoCAD .NET API and by the .NET Framework, and you will create your own classes to represent the logical objects you use in your plug-ins. Let’s take a look at how you define a class in Visual Basic .NET.
An important concept in object-oriented programming is inheritance, which allows you to customize or extend an existing class instead of writing your own class from scratch. We touched on this concept earlier in this lesson and will look at it more deeply later.
The following code snippet shows an example of a simple class declaration in Visual Basic .NET. While reviewing this, you will also start looking more closely at the syntax of the Visual Basic .NET language.
 Public Class Point
    Private mXCoord As Integer
    Private mYCoord As Integer

    Public Sub  SetLocation(ByVal x As Integer, ByVal y As Integer)
      Me.mXCoord = x
      Me.mYCoord = y
      ' Do some calculations
    End Sub
  End Class
The first word, Public, sets the accessibility of the class. Making a class public means that any programmer can gain access to this class in their own application. This is how the AutoCAD API defines classes (such as the Line class) for you to use in your plug-ins. Other options would be Internal (if only to be used within this project) or Private (if only to be used in the context in which it is declared). As your programming skills develop, you’ll learn the best ways to use the different accessibility levels. While you’re learning, you can just use public if you’re not sure.
The next word, Class, tells the compiler that what follows is a class declaration. The next word, Point, is the name of your class. Notice that there is a matching End Class statement at the end of the code. All the code between Public Class Point and End Class is your class implementation.
Variable Declarations
Variables are simply places to store information so you can retrieve it later. They are the programming equivalent of writing down something you don’t want to forget.
Private mXCoord As Integer
Private mYCoord As Integer
These two lines define two class member variables. Member variables contain data that might be used in different portions of the code in your class. You define member variables in one place and can then use them in different places. They keep the information you store in them for the lifetime of the instance of the class, but each class instance can have different information stored in its member variables.
The Private keyword is used to set the accessibility for these variables so that they can only be accessed from within the class.
The word Integer refers to the “Integer” type, which tells the compiler that you want to reserve some space to store some whole numbers. The most common types handled by Visual Basic .NET are floating point (i.e. decimal) numbers, integer numbers and text (known as strings). mXCoord and mYCoord are unique names given to identify these variables.
Note: By convention, most programmers prefix member variable names with ‘m’ or ‘m_’.
Methods
The following block of code is called a method:
    Public Sub  SetLocation(ByVal x As Integer, ByVal y As Integer)
      Me.mXCoord = x
      Me.mYCoord = y
      ' Do some calculations
    End Sub
Any block of code in a class which performs a particular task (or action) is called a method. The method declaration starts with the word Public because we want someone using our class in their own project to be able to call this method.
The next word is Sub, which means subroutine. Methods in Visual Basic .NET can be either Subroutines or Functions. We’ll discuss the difference later. Notice that the Sub keyword is matched by the End Sub keywords further down the code. As for Class and End Class, the implementation of the method is contained between these lines.
The word SetLocation is the unique name you use to identify – and make use of – this method.
The portion of the statement between the parentheses () contains the method’s parameters. A parameter (or set of parameters) is the input provided to a method for it to use and work on. You have to pass two integer parameters to the SetLocation method when you call it. The integers we’re passing in are named x and y – we use those names in the code inside the method to access the parameters we passed in.
Inside the method, you can see the following lines:
      Me.mXCoord = x
      Me.mYCoord = y
The word Me identifies the current instance of your class. In the first line, you are accessing the member variable mXCoord of this instance and so you use the statement Me.mXCoord. The “=” is called the assignment operator and means that the variable on the left side of the operator will have its value changed to that specified on the right side. In this case, you are setting the value of the mXCoord member variable of the current instance of your Point class (using Me) to the value passed into the method via the parameter x.
The next line does the same, but for mYCoord and y.
Lines starting with an apostrophe “ ' ” are ignored by Visual Basic .NET. This is how you add comments to your code – a comment is some text you write in plain language to describe what the code is doing. You can also use comments to hide portions of code from the compiler that you don’t want to be built into your .NET Plug-in DLL.
Creating Class Objects
Now you have a simple class defined using Visual Basic .NET. The next question is …
How do you create objects of this class?
As discussed previously, an object is an instance of a class. The code below shows how to create an object of a particular class. These lines would typically be contained in the implementation of another class (almost all code in a Visual Basic .NET program is contained in classes – you’ll see how AutoCAD starts running your code later).
      Dim pt As Point = New Point
      pt.SetLocation(10,10)
In the first line above, you define a new variable named pt which is defined to be of type Point. You then use the assignment operator to set its initial value to be a new instance of the Point class, created using the New keyword. The second line shows how to call the SetLocation() method, passing in some parameter values (x = 10 and y = 10). When this line is executed, control will be passed to the SetLocation function you defined above and it will set mXCoord and mYCoord to 10 for the instance of the Point class you created and stored in the variable pt.
Subroutines and Functions
The method SetLocation() was defined using the Sub keyword. We define a method using Sub if we don’t want to return any information from that method. But what if I wanted to create a method that took two parameters, performed some calculation with them, and returned the result to the code that called the method?
Then you have to use the Function keyword. We could add the following function to our Point Class
    Public Function Multiply(ByVal a As Integer, ByVal b As Integer)As Integer
      Return a * b
    End Function
We’ve changed the Sub keyword to Function; the As Integer we added tells the compiler that this method (function) will return an Integer value to the caller, and the Return a*b is returning the value of ‘a’ multiplied by ‘b’.
We would call that function like this:
Dim theResult As Integer = pt.Multiply(6 * 7)After this line of code is executed, the variable theResult will be set to the value 42.
Note that theResult is a variable, but it is not a member variable. Unlike a member variable (which keeps a record of the data it holds for as long as the class instance it belongs to exists), theResult has a scope that is limited to the method in with it is defined, and can only be accessed from within the method that contains it. This is why the definition of theResult used the Dim keyword instead of Public or Private. You will only use Public or Private for member variables. And a variable inside a function like this doesn’t remember its value between function calls (unless you also use the keyword Static – but that is getting beyond the scope of this tutorial).
You will be writing and calling subroutines and functions in this tutorial.
Properties
A core feature of Visual Basic .NET and other .NET languages is the ability for classes to have properties. A property is simply a way of allowing access to a member variable of a class. You will use properties in two ways:
Start by creating your own property and then you’ll see how to use it from outside your class. Extending the code snippet, here is how a property can be added to the same class:
  Public Class Point
    Private mXCoord As Integer
    Private mYCoord As Integer

    Public Sub  SetLocation(ByVal x As Integer, ByVal y As Integer)
      Me.mXCoord = x
      Me.mYCoord = y
      ' Do some calculations next
    End Sub

    Public Property X() As Integer
      Get
        Return Me.mXCoord
      End Get
      Set(ByVal value As Integer)
        Me.mXCoord = value
      End Set
    End Property
  End Class
The above code, in bold, shows how you can expose a property from your class, whether for use in your own project or for consumption by other programmers in their projects.
The property declaration starts with the Public keyword – you know what that means by now. Then we tell the compiler that the Property is named X and is an Integer.
The Get…End Get part of the property declaration describes what happens when someone reads the value of the property and the Set…End Set part does the same for when someone writes to or sets the value of the property.
In this example, our Set implementation is simply setting mXCoord to the value of the parameter value. Usually you would include code to test that the value passed in acceptable, and not set the member variable to the new value if it wasn’t.
When someone attempts to access your property for a particular Point object, the Get part of the property executes and the Return statement passes back the value of your internal data member – just like you saw for a function.
Let’s now see how this property can be used:
      Dim pt As Point = New Point
      pt.SetLocation(10, 10)
      Dim xVal As Integer = pt.X
      pt.X = 9
You start by creating a new Point object, named pt, as you saw previously.
The lines in bold show you how to read (or get) the X property of your pt object, assigning its value to a variable xVal, and then how to write (or set) it to a new value of 9.
A lot of code you write will be using properties like this exposed by the AutoCAD API and the .NET Framework class library.
It is good practice to keep member variables (or data variables) private and to allow access to them from outside your class using properties. This is because your property can check if someone is trying to set your member variable to a valid value before it actually sets the value of the member variable. (Similarly, you can check a variable has been correctly initialized before passing its value back to the caller).
For example, if you have a member variable that holds an AutoCAD Color Index (ACI) value, you don’t want to allow someone to set it to a value greater than 255.
An equally important reason for using properties is that they hide the internal implementation details of your class from the outside world.
For example, you may have originally designed a class to have a member variable called ‘Area’. Later, you may realize that you don’t have to store the value of ‘Area’ because you can easily calculate it whenever you need it from your member variables ‘Length’ and ‘Width’. If you’d made your member variable public, then any code that used your class would be broken by your changes. If you’d implemented a property instead, you could change your Get to return ‘Length*Width’ instead of ‘Area’.
Inheritance
In object-oriented programming, a class is simply a collection of data (member variables), methods and properties (and events, which we don’t cover in this tutorial). The methods and properties of the class contain all the code that is executed when you compile and run your plug-in. There is one more extremely powerful object-oriented programming concept you need to know because it forms the basis of much of the AutoCAD .NET API. This is inheritance.
Inheritance is a technique that allows you to customize or extend (or specialize) the behavior of an existing class by modifying or adding to its member variables, methods and properties. The most relevant way to explain this is to explain how AutoCAD uses classes to represent objects in a DWG file. Let’s look at the inheritance hierarchy for the AutoCAD Line and Arc classes.
Think of inheritance as being similar to an evolutionary tree. More specialized and complex classes inherit from (‘are derived from’) simpler less specialized classes, just like more complex organisms evolve from simpler organisms (like amphibians evolved from fish, and reptiles evolved from amphibians). Similarly, two complex classes may be derived from the same simpler class in the way that two modern animals may share a more primitive common ancestor (humans and chimpanzees, for example).
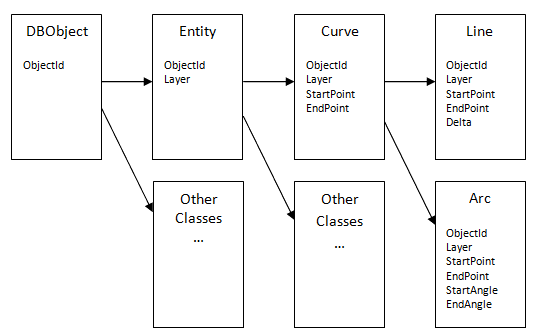
Everything inside an AutoCAD drawing is a kind of DBObject. That means that DBObject is a class that exposes the data, methods and properties that are common to everything that is saved in a DWG file. For example, DBObject has an ObjectId property. An ObjectId is a unique identifier for each object in an open drawing.
Some kinds of DBObject are objects that have a graphical representation. This subset of DBObjects is represented by the Entity class. The Entity class is derived from the DBObject class. That means Entity inherits all the data, methods and properties from DBObject, and adds new data, methods and properties of its own. For example, Entity inherits the ObjectId property from DbObject. Every object that is drawn by AutoCAD has a Layer, so one of the properties Entity adds to the DBObject properties is a Layer property.
Some types of Entity are very similar – they are all some kind of curve. Therefore, the Curve class inherits all the data, methods and properties of Entity and adds properties like StartPoint and EndPoint.
Finally, Line and Arc are both types of Curves. They inherit everything from Curve and add their own. For example, Arc adds StartAngle and EndAngle properties; Line adds a Delta property (a vector representing the length and direction of the line)
Here’s a diagram to make that clearer, showing just the properties we mentioned in the examples above. The arrows show the direction of inheritance – moving to greater complexity/specialization.
You will be using inheritance in this tutorial, so let’s see how you can inherit from the Point class you’ve just been working with. The Point class is just a two-dimensional point (it only has X and Y coordinates). To create a 3-dimension point class, you could inherit from your current Point class and add an extra member variable and property to represent its z coordinate, like this:
  Public Class NewPoint
    Inherits Point

    Private mZCoord As Integer

    Public Property Z() As Integer
      Get
        Return Me.mZCoord
      End Get
      Set(ByVal value As Integer)
        Me.mZCoord = value
      End Set
    End Property
  End Class
When we create an instance of this new class, we can access all the properties inherited from Point and also those added by NewPoint, like this:
      Dim pt As NewPoint = New NewPoint
      pt.SetLocation(10, 10)
      Dim xVal As Integer = pt.X
      pt.X = 9
      pt.Z = 12
To see the full inheritance tree of the AutoCAD API, open the class map drawing that was installed with your ObjectARX SDK (<ObjectARX 20xx>\classmap\classmap.dwg). It’s big, isn’t it?
Was this information helpful?
The Assistant can help you find answers or contact an agent.
What level of support do you have?
Different subscription plans provide distinct categories of support. Find out the level of support for your plan.