Need help? Ask the Autodesk Assistant!
The Assistant can help you find answers or contact an agent.
What level of support do you have?
Different subscription plans provide distinct categories of support. Find out the level of support for your plan.
Autodesk Support
Mar 31, 2023
|
In this lesson you will create your very first basic AutoCAD plug-in for keeping block attributes parallel to the WCS x-axis. All the demonstrated videos are recorded for AutoCAD 2013 however it holds good for the later versions too. |
Provide Feedback: Please provide feedback about this AutoCAD Training or this lesson via email: myfirstplugin@autodesk.com Lesson Downloads
| ||||

Steps to Create Your First Plug-in
* If you are using the completed sample projects rather than starting from scratch from the steps we provide here, we assume that you have installed AutoCAD to the C:\Program Files\Autodesk\AutoCAD 2024 folder. If your installation location for AutoCAD is different from this, then to be able to debug the completed sample projects, you must follow these steps.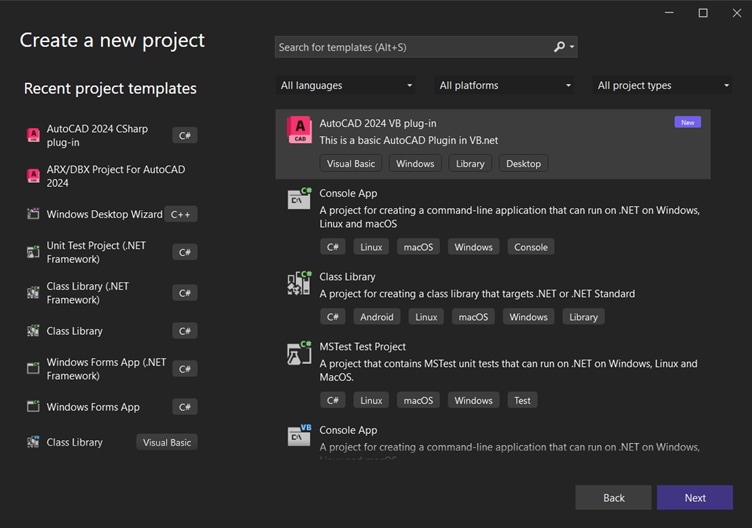
The AutoCAD.NET Wizard Configurator dialog will now be displayed. Click the ellipsis button next to the topmost empty textbox; browse in the folder selection dialog that appears to the location where you extracted the contents of the ObjectARX 20xx SDK, and select the inc subfolder. Do the same for the other textbox, and select your AutoCAD installation folder – the default location for AutoCAD 20xx is C:\Program Files\Autodesk\AutoCAD 20xx. Keep the other options at their defaults and click Ok.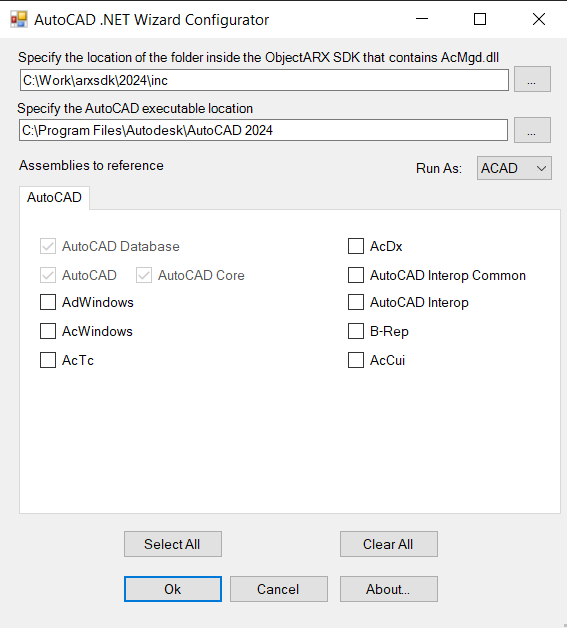
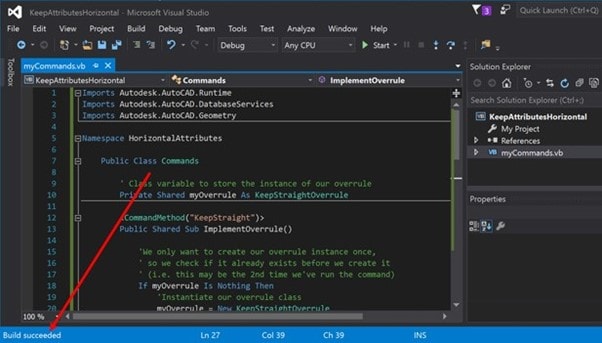
Visual Studio Community will create a default code project for you and display the code in the code window.
Save the project:
On the File menu, click Save All. In the display window type C:\ test (or your preferred file location) in the Location box, and then click Save.
Close and reopen the project:
On the File menu, click Close Project; then again on the File menu, click Recent Projects and Solutions and select KeepAttributesHorizontal from the list. This is to ensure Visual Studio has correctly parsed the project files for its IntelliSense feature.
Check references:
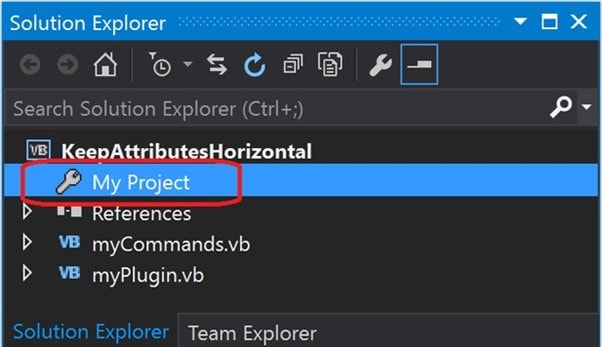
In the Solution Explorer window on the right-hand side of the Visual Studio Community window, double-click My Project.
Visual Studio Community now displays your project settings in place of your code window. Click on the References tab, and check that AcCoreMgd, AcDbMgd and AcMgd are displayed in the list and that their paths are correctly showing the path to your ObjectARX 20xx\inc folder.
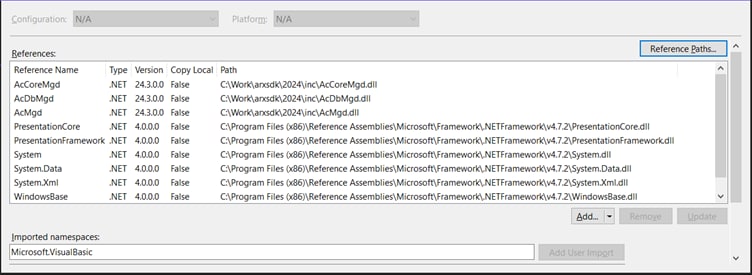
If for some reason AcCoreMgd, AcMgd and AcDbMgd are not listed, click the Add… button, select Reference…, browse to the ObjectARX\inc folder and select those files. Then select each reference in the list to view its properties in the window on the lower right of the Visual Studio Community window, and set the Copy Local property to False.
Imports Autodesk.AutoCAD.Runtime
	Imports Autodesk.AutoCAD.DatabaseServices
	Imports Autodesk.AutoCAD.Geometry

	Namespace HorizontalAttributes

	    Public Class Commands

	        ' Class variable to store the instance of our overrule
	        Private Shared myOverrule As KeepStraightOverrule

	        <commandmethod("keepstraight")>
	        Public Shared Sub ImplementOverrule()

	            'We only want to create our overrule instance once,
	            ' so we check if it already exists before we create it
	            ' (i.e. this may be the 2nd time we've run the command)
	             If myOverrule  Is Nothing Then
	                'Instantiate our overrule class
	                myOverrule = New KeepStraightOverrule
	                'Register the overrule
	                Overrule.AddOverrule(
	                  RXClass.GetClass(GetType(AttributeReference)),
	                  myOverrule, False)
	            End If
	            'Make sure overruling is turned on so our overrule works
	            Overrule.Overruling = True

	        End Sub
	    End Class

	    'Our custom overrule class derived from TransformOverrule
	    Public Class KeepStraightOverrule
	        Inherits TransformOverrule

	        'We want to change how an AttributeReference responds to being
	        ' transformed (moved, rotated, etc.), so we override its
	        ' standard TransformBy function.
	        Public Overrides Sub TransformBy(ByVal entity As Entity,
	                                         ByVal transform As Matrix3d)

	            'Call the normal TransformBy function for the attribute
	            ' reference we're overruling.
	            MyBase.TransformBy(entity, transform)
	            'We know entity must be an AttributeReference because
	            ' that is the only entity we registered the overrule for.
	            Dim attRef As AttributeReference = entity
	            'Set rotation of attribute reference to 0 (horizontal)
	            attRef.Rotation = 0.0

	        End Sub
	    End Class
End Namespace
</commandmethod("keepstraight")>


Optionally, you can also remove the file MyPlugin.vb from the project. Right click on MyPlugin.vb in the Solution Explorer and select Delete. It doesn’t matter if you don’t delete it – the default code in there isn’t doing anything.

Don’t worry about the details of the code, you’ll be studying this in detail in Lesson 3[EK3] . For now, it’s enough to know that the text in green are ‘comments’. This isn’t the program code itself – it is text explaining what the code is doing. It’s very important to write comprehensive comments in your projects – even the best programmers forget what their code was supposed to be doing when they come back to it six months later. If you read through the comments now, you’ll probably get a good idea of what the code is doing.
That’s it! You have just written your first plug-in for AutoCAD. Let’s run it to see what it does.
Running the Plug-in
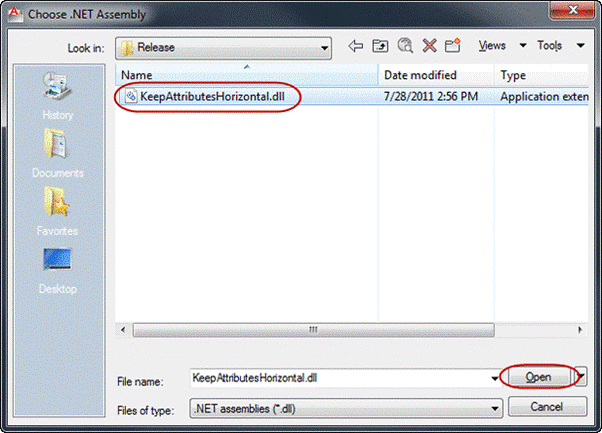
Congratulations! You’ve just written your first plug-in for AutoCAD. You will be reviewing the code in detail in Lesson 3.
Before you move on to the next lessons, let us go back to some of the things we skipped over earlier, starting with basic concepts about programming, and the benefits it can bring to your day-to-day work.
Additional Topics
The Visual Basic .NET code you have just executed to change the behavior of attributes in a drawing is less than 30 lines long (ignoring blank lines and comments). Here you see a small amount of code working in a similar way to any internal AutoCAD command. If someone new to AutoCAD saw your plug-in working, they would think it was a new AutoCAD feature. Software programming allows you to capture the logic of a particular functionality once and then reap the benefits over and over again - every time you want to perform this functionality.
A simple answer to this question is: Computer programming is the process of creating a sequence of instructions to tell the computer to do something. You can look at your program as a sequence of instructions. In the remaining lessons in this tutorial, you will learn to interpret what the various lines of code you are writing are telling the computer to do.
If you were to explain a computer to a young child, you might say: a computer is a tool that follows instructions you provide. Programming is one way of giving instructions to the computer. Internally, a computer sees these instructions encoded as a series of numbers (also called machine code). The set of human-readable instructions you saw at the beginning of this lesson is called source code and the computer converts these instructions into machine code which it can then read and execute. A sequence of such instructions (or code), written to perform a specific task, is called a program and a collection of such programs and related data is called software. AutoCAD is one such software product.
Source code can be written in different languages, just as humans use different languages to communicate. The language you will be using in this guide is called Visual Basic .NET, often called VB.NET for short. (‘.NET’ is pronounced ‘dot net’).
Note – Visual Basic .NET is the newest version of Microsoft Visual Basic. Don’t confuse it with Visual Basic 6 or Visual Basic for Applications (VBA), which are much older and nowhere near as powerful as Visual Basic .NET.
API is the acronym for Application Programming Interface: the way a software programmer can communicate with a software product. For instance, the AutoCAD API is the way programmers can work with AutoCAD, and it establishes what functionality a software programmer can use within AutoCAD. For example, you can program AutoCAD to add a line to a drawing because AutoCAD exposes functionality to do that through its API.
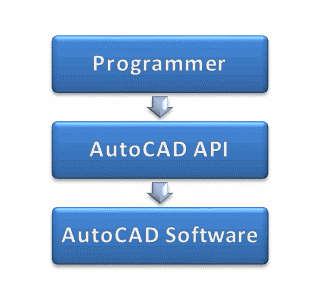
To put this slightly differently: commercial software companies, such as Autodesk, often distribute a set of libraries which you can use in your own program to interact with a particular software product, such as AutoCAD, and extend its functionality. This set of libraries is known as the software product’s API.
The type of program you write to interact with a software product and extend its functionality will depend upon how the API has been designed and what has been exposed (through APIs) for you to work with.
A software plug-in is a type of program module (or file) that adds functionality to a software product, usually in the form of a command automating a task or some customization of the product’s behavior. When you talk about a plug-in for AutoCAD – you may also hear the term add- in or app used – we mean a module containing code that makes use of the AutoCAD API. AutoCAD loads such plug-ins and uses them to adjust its behavior under certain conditions, such as when a particular command is executed by the user of the plug-in.
AutoCAD is not Installed in the Default Location
The completed sample projects assume that you have installed AutoCAD to the C:\Program Files\Autodesk\AutoCAD 20xx folder. If your installation location for AutoCAD is different from this, then to be able to debug the completed sample projects, you must either:
Editing the completed project files by hand
A limitation of Visual Studio Community is that some project settings are not editable through the user interface. One of these hidden settings is the location of the AutoCAD executable (acad.exe) that you load your .NET plug-in into in order to debug it. To correct the provided completed projects for your AutoCAD installation location:
Here is an example of the .vbproj.user file contents showing the string you need to replace (make sure you update the file paths to match the version of AutoCAD you are working on):
<?xml  version="1.0" encoding="utf-8"?>
  <Project  ToolsVersion="4.0" xmlns="http://schemas.microsoft.com/developer/msbuild/2003">
    <PropertyGroup>
      <ReferencePath>C:\ObjectARX 20xx\inc;C:\ObjectARX 20xx\inc\inc-win32</ReferencePath>
      <PublishUrlHistory />
      <InstallUrlHistory />
      <SupportUrlHistory />
      <UpdateUrlHistory />
      <BootstrapperUrlHistory />
      <ErrorReportUrlHistory />
       <FallbackCulture>en-US</FallbackCulture>
       <VerifyUploadedFiles>false</VerifyUploadedFiles>
    </PropertyGroup>
    <PropertyGroup  Condition="'$(Configuration)|$(Platform)' == 'Debug|AnyCPU'">

StartProgram>C:\Program Files\Autodesk\AutoCAD 20xx\acad.exe</StartProgram>
       <StartAction>Program</StartAction>
    </PropertyGroup>
    <PropertyGroup  Condition="'$(Configuration)|$(Platform)' == 'Release|AnyCPU'">
       <StartAction>Program</StartAction>
      <StartProgram>C:\Program Files\Autodesk\AutoCAD 2024\acad.exe</StartProgram>

    </PropertyGroup>
  </Project>
Was this information helpful?
The Assistant can help you find answers or contact an agent.
What level of support do you have?
Different subscription plans provide distinct categories of support. Find out the level of support for your plan.